Let me tell you the story of THE dress…
My now husband and I got engaged in autumn last year and had a lovely private wedding (just the two of us and two witnesses that we borrowed from the hotel we were staying at) in beautiful Cornwall last week.
Like for many sewists, the question was to sew or not to sew my wedding dress. I was never sure if I wanted to sew my own dress. I thought it might be too much pressure to sew a wedding dress, which everyone will closely look at and which has to withstand a whole day of wedding activities. With everything else there is to organise for a wedding it might just be too much?Then however, we decided that we wanted to get married just the two of us, and since there was barely anything else we had to organise, I had plenty of time to sew a dress.
In terms of inspiration for the dress, I did my share of Pinterest browsing and wedding magazine reading. In the end though it came together quite organically without a concrete plan.
I knew that I didn’t want a wedding dress that I could only wear once and then would gather dust in a closet. I thought about doing a simple style dress and then dying it afterwards. I quickly realised though that I wanted to do separates, which I could wear individually and easily incorporate into my wardrobe.
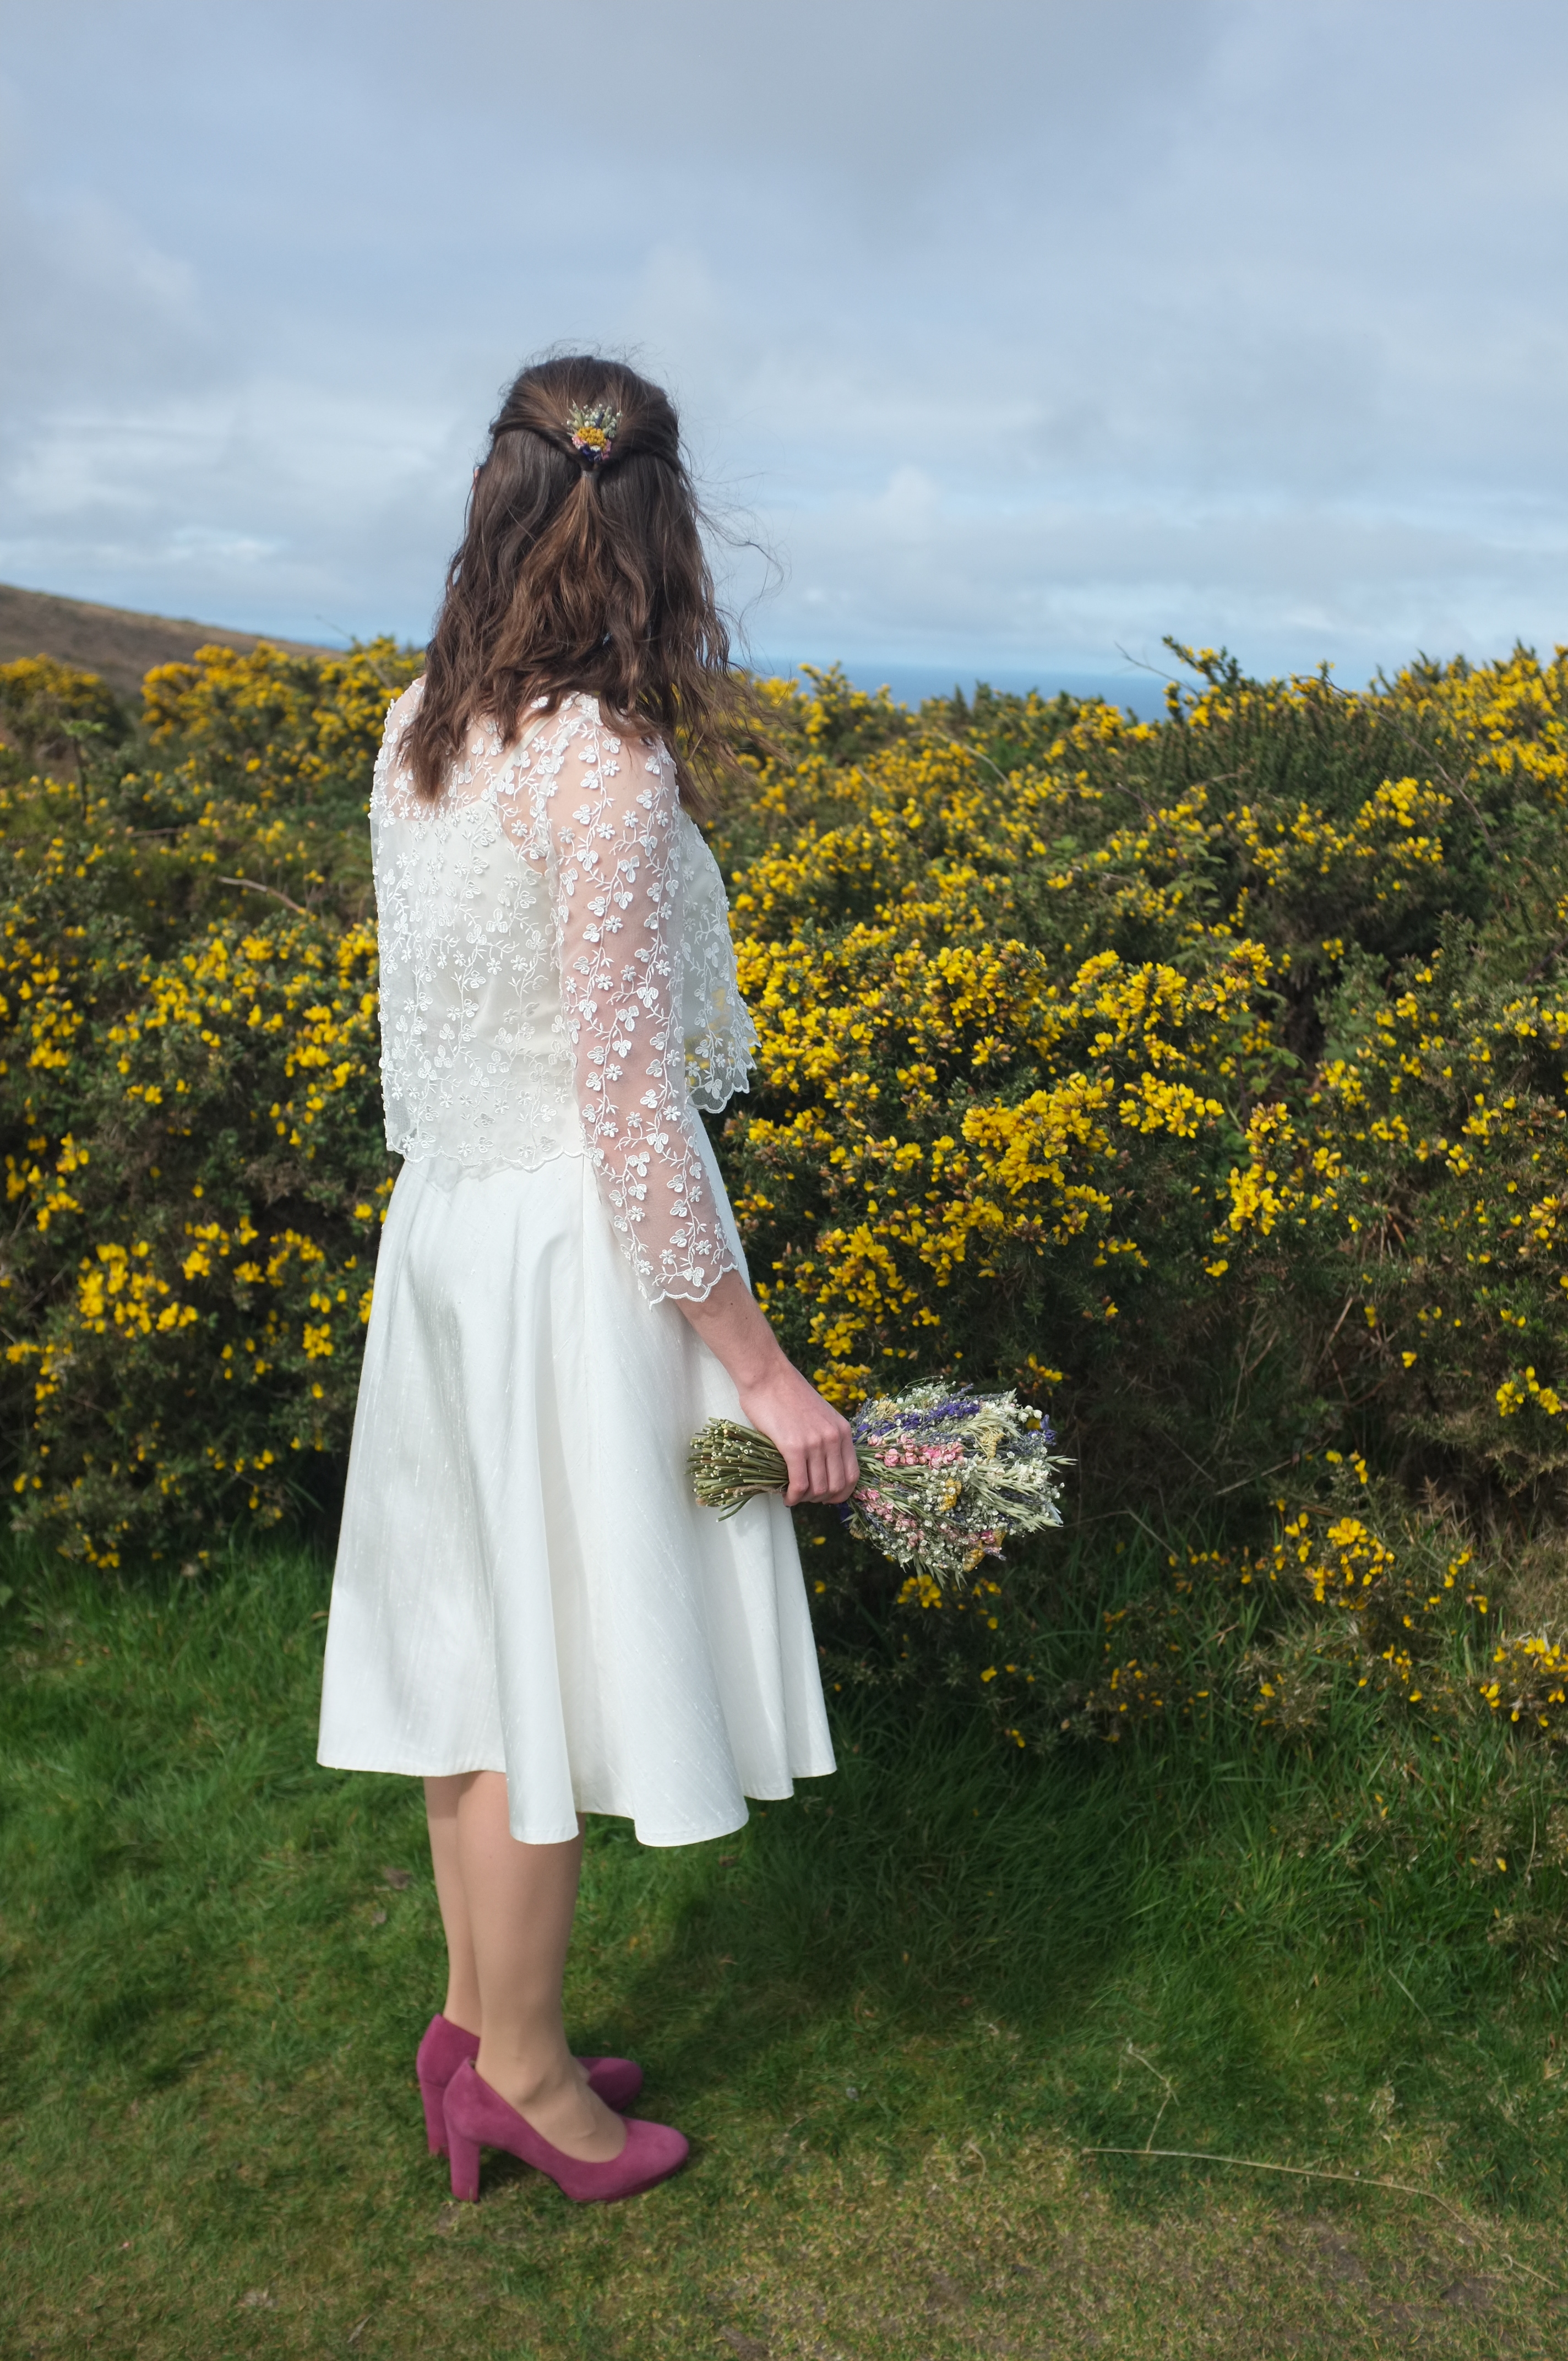
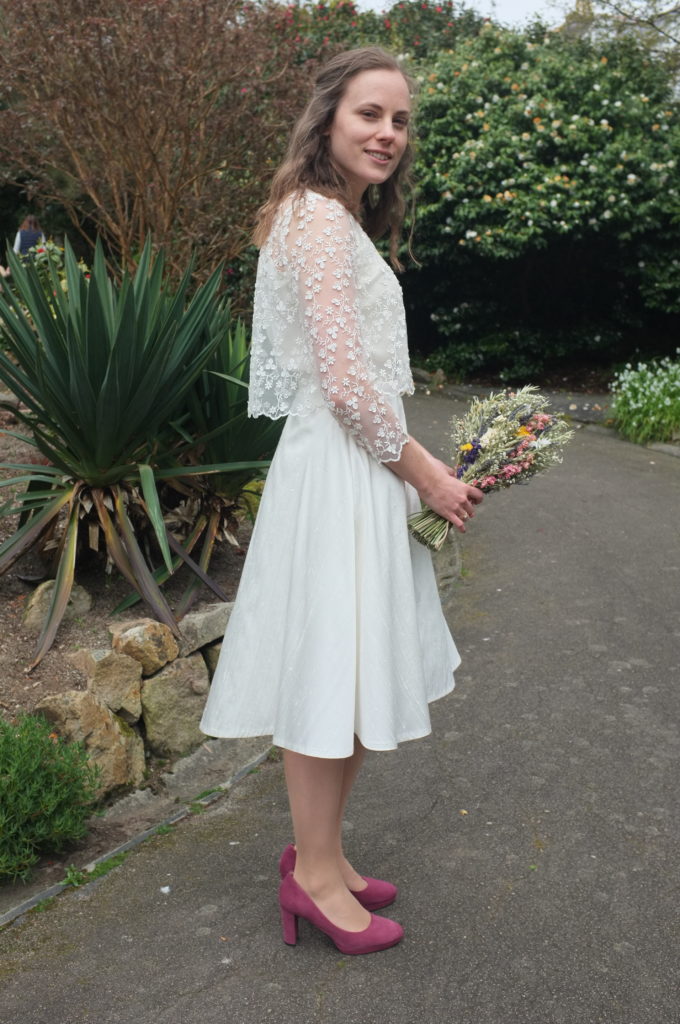
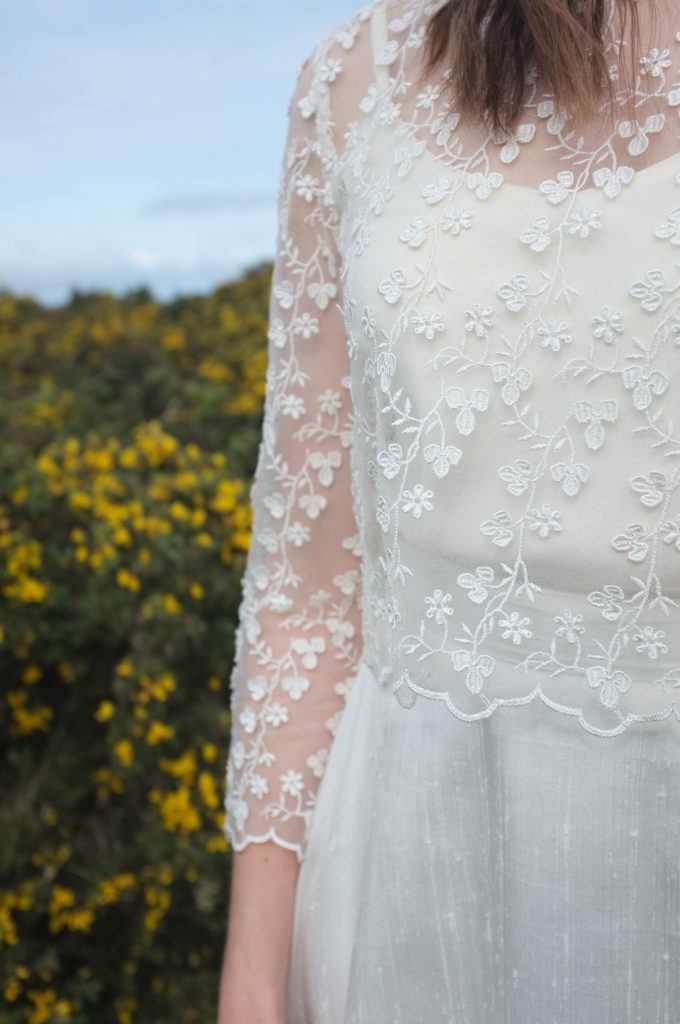
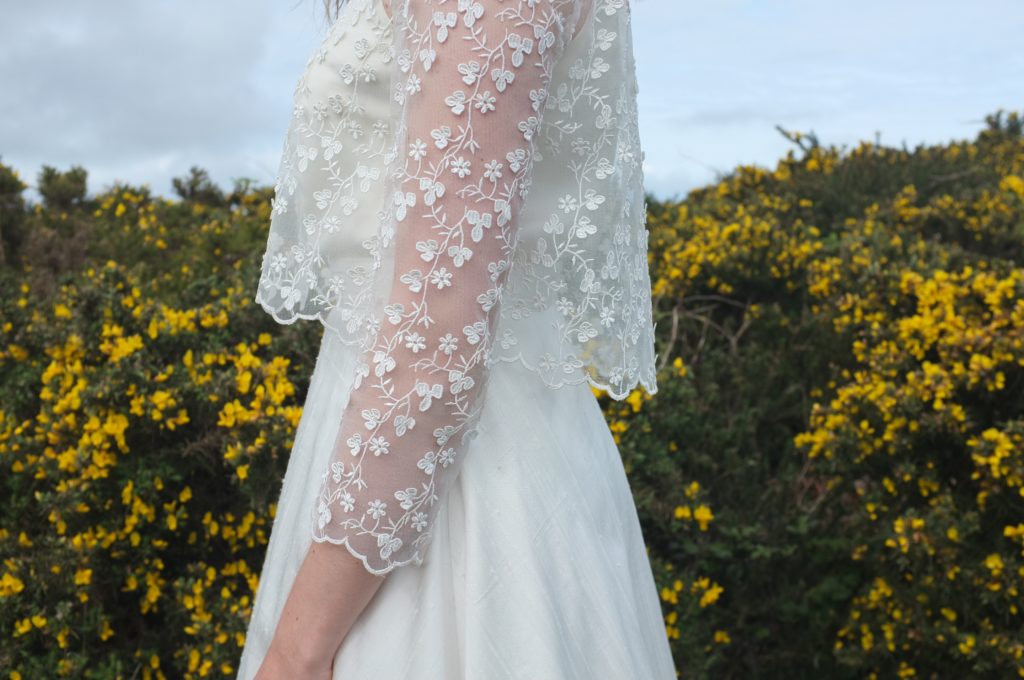
Before settling on any patterns, I first went to buy some fabric. I find it easier to let the fabric inspire me rather than trying to find a fabric that matches my vision. While I didn’t think it was necessary to wear white at a wedding, I did decide to go with white, because I wanted to work with lace, and pretty lace is a lot easier to find in white than in colours. So off we went to Goldhawk Road on my birthday. I knew I wanted to work with nice quality fabrics. In the end I got some sand-washed silk, some dupion silk and some 3D floral lace. I had already ordered some lace swatches from a bridal fabric shop before our shopping trip and while they were gorgeous, they felt a little bit too fancy and formal. So when I came across this simple floral lace, I was immediately sold. All fabrics were in slightly different shades of natural white. I didn’t try to match the colours exactly to allow the dress a little bit of dimension.
The first element of the ensemble that I decided on was the slip dress in sand-washed silk. I had wanted to make a silk slip for ages to wear under some unlined dresses. For the pattern I used the Tessuti Sadie Slip Dress. It’s a simple bias-cut dress with a nice v neckline. I made a toile in some polyester lining in size S, graded out to an M at the hips. Overall it fit well, I only had some fabric pooling at the lower back. I tried to find out if there was such a thing as a sway back adjustment for bias cut dresses, but the only way I could remove the access was with darts (which the Sadie Dress pattern includes). As I knew that I would wear it under a skirt, I decided to leave them off and embrace the blousiness. I then moved on to my sandwashed silk. To make sure to not distort the fabric while cutting I used some spray starch to turn it less shifty. This worked reasonably well but was still quite a pain to cut out. To assemble it I used french seams. The neckline is finished with a facing which I cut with the pinking blade of my rotary cutter to avoid any hems showing through at the right side. Instead of the suggested spaghetti straps, I made slightly wider and less fiddly straps. Then I let it hang for some days before hemming it. To do this fabric justice, I did a hand-rolled hem for the first time and I must say it’s utterly satisfying. This might be my new favourite hand-sewing technique!
Next I had to decide on a skirt. I was contemplating different pleating and gathering versions, but in the end I realised that I wanted to keep the volume at the waist to a minimum. So the obvious choice was a half circle skirt. Funnily enough this was my first circle skirt ever. Luckily I found By Hand London’s Circle Skirt Calculator, which made it super easy. I finished the waistband with a white grosgrain ribbon which I stitched down by hand. The skirt is closed with an invisible zipper and hooks and eyes at the lapped waistband. Again I let the skirt hang for several days before levelling it. Originally I wanted to finish the hem with some gold bias binding to add a little sparkle. Half way through attaching it though I realised that the bias binding was too stiff and removed it again. To preserve as much length as possible I just serged the hem and folded it up once to attach it with invisible hand stitches.
Once I had the base of the dress, I had to decide on the lace top. To figure out what would work best I played around with the skirt toile and some top ideas to figure out how the shapes would work together. In the end I went with a dart-less loose crop top with a boatneck and bracelet-length sleeves. The bodice is based on a top I had in my closet and after trying some different sleeves, I settled on the sleeves from Lotta Jansdotter’s Esme Top from her Everyday Style Book which I shortened to the right length. This lace has a lovely scalloped border which I used for the hem of the bodice and the sleeves. The seams are all french seams, for which I removed some of the appliques to make sure the french seams wouldn’t be too bulky. The trickiest part of the top was definitely the neckline. Originally I wanted to finish it with some bias tape cut from the sand-washed silk scraps but somehow it didn’t look right. So I decided to mimic the scalloped hem by sewing a dense zigzag stitch around the neckline. To stabilise the fabric I used tissue paper. It still turned out a little wonky but some hand sewing and some appliqued flowers fixed it.
I have to say I thoroughly enjoyed the process of sewing this dress. It helped that I was working with simple shapes and not too complicated techniques. In the end a lot of hand sewing went into this dress, but I really liked that (it gave me the perfect excuse to watch Project Runway). Overall I probably spent 5 days working on this dress (including the toiling) which in hindsight seems quite short for a wedding dress. Then again I didn’t sew a princess dress like some others do.
The final dress was perfect for the occasion. It was fancy enough to say wedding dress but simple and practical enough for our low-key celebration. The fabrics were a joy to wear and the skirt was perfectly swishy. I love how the silk skirt looks different in each picture depending on where the wind came from (and wind there is plenty in Cornwall).
Here some of the details:
- Fabrics: Sand-washed Silk (UK Textiles), Dupion silk (Goldbrick Fabrics), Lace (Classic textiles); all Goldhawk road; estimated costs £130
- Haberdashery: Silk thread, zipper, hook and eyes, grosgrain ribbon; all Minerva Crafts, estimated cost £15
- Shoes: Clarks
- Dried Flowers: English Flower Farmer –> highly recommend them, they have gorgeous flowers and perfect service
- Engagement and wedding ring: Goodman Morris
In the end we decided to take our own wedding pictures. My pictures were all taken by my lovely husband (who had lots of practice thanks to this blog). The couple pictures were taken with a tripod and self timer. I love how they turned out, this gorgeous yellow colour was everywhere in Cornwall and turned out to be the perfect back-drop.


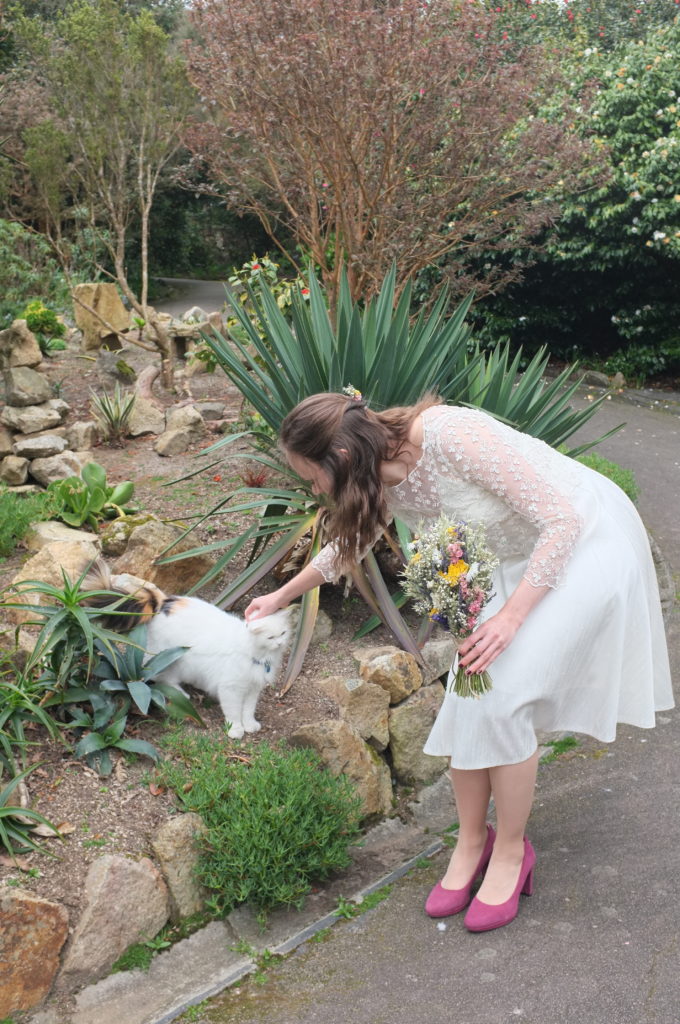
 Oh, and we had our own fluffy white wedding cat who wanted to be in all the pictures. So here is a picture of a cat. You’re welcome!