Summer of Basics Part 2 – The Persephone Pants

The whole sewing scene has been going crazy about the Anna Allen Clothing Persephone Pants since they came out earlier this year and finally I know why. It really is a magical pattern that looks amazing on everyone!

When they came out, I was immediately tempted to make them; however, I already have the Lander Pant pattern in my stash and the two patterns are very similar. I’ve already made the Lander Pants this winter but struggled to make them work for me (read all about it here). I could have probably experimented more with that pattern but in the end I decided to buy the Persephone pattern, based on all the amazing reviews.

These Persephones are on my Summer of Basics list since I’ve been searching for the perfect wide-legged trousers for ages. What I love about Summer of Basics is that it forces me to really focus on garments that I actually need in my wardrobe. The fact that the challenge is spread out over three months allows me to take it slow and make them with the attention they deserve.

With these trousers I knew I had to get the fit right, so I read a lot of reviews and decided to make the shorts version as a wearable muslin. Even though a lot of people had mentioned that they had to size down with this pattern, I decided to go with the size that corresponded to my measurements in the hips (a size 12) and take it in at the waist through the darts. While the shorts are comfy and wearable, they did turn out too big as anticipated, but at least I knew it would be safe to size down for the long pair.

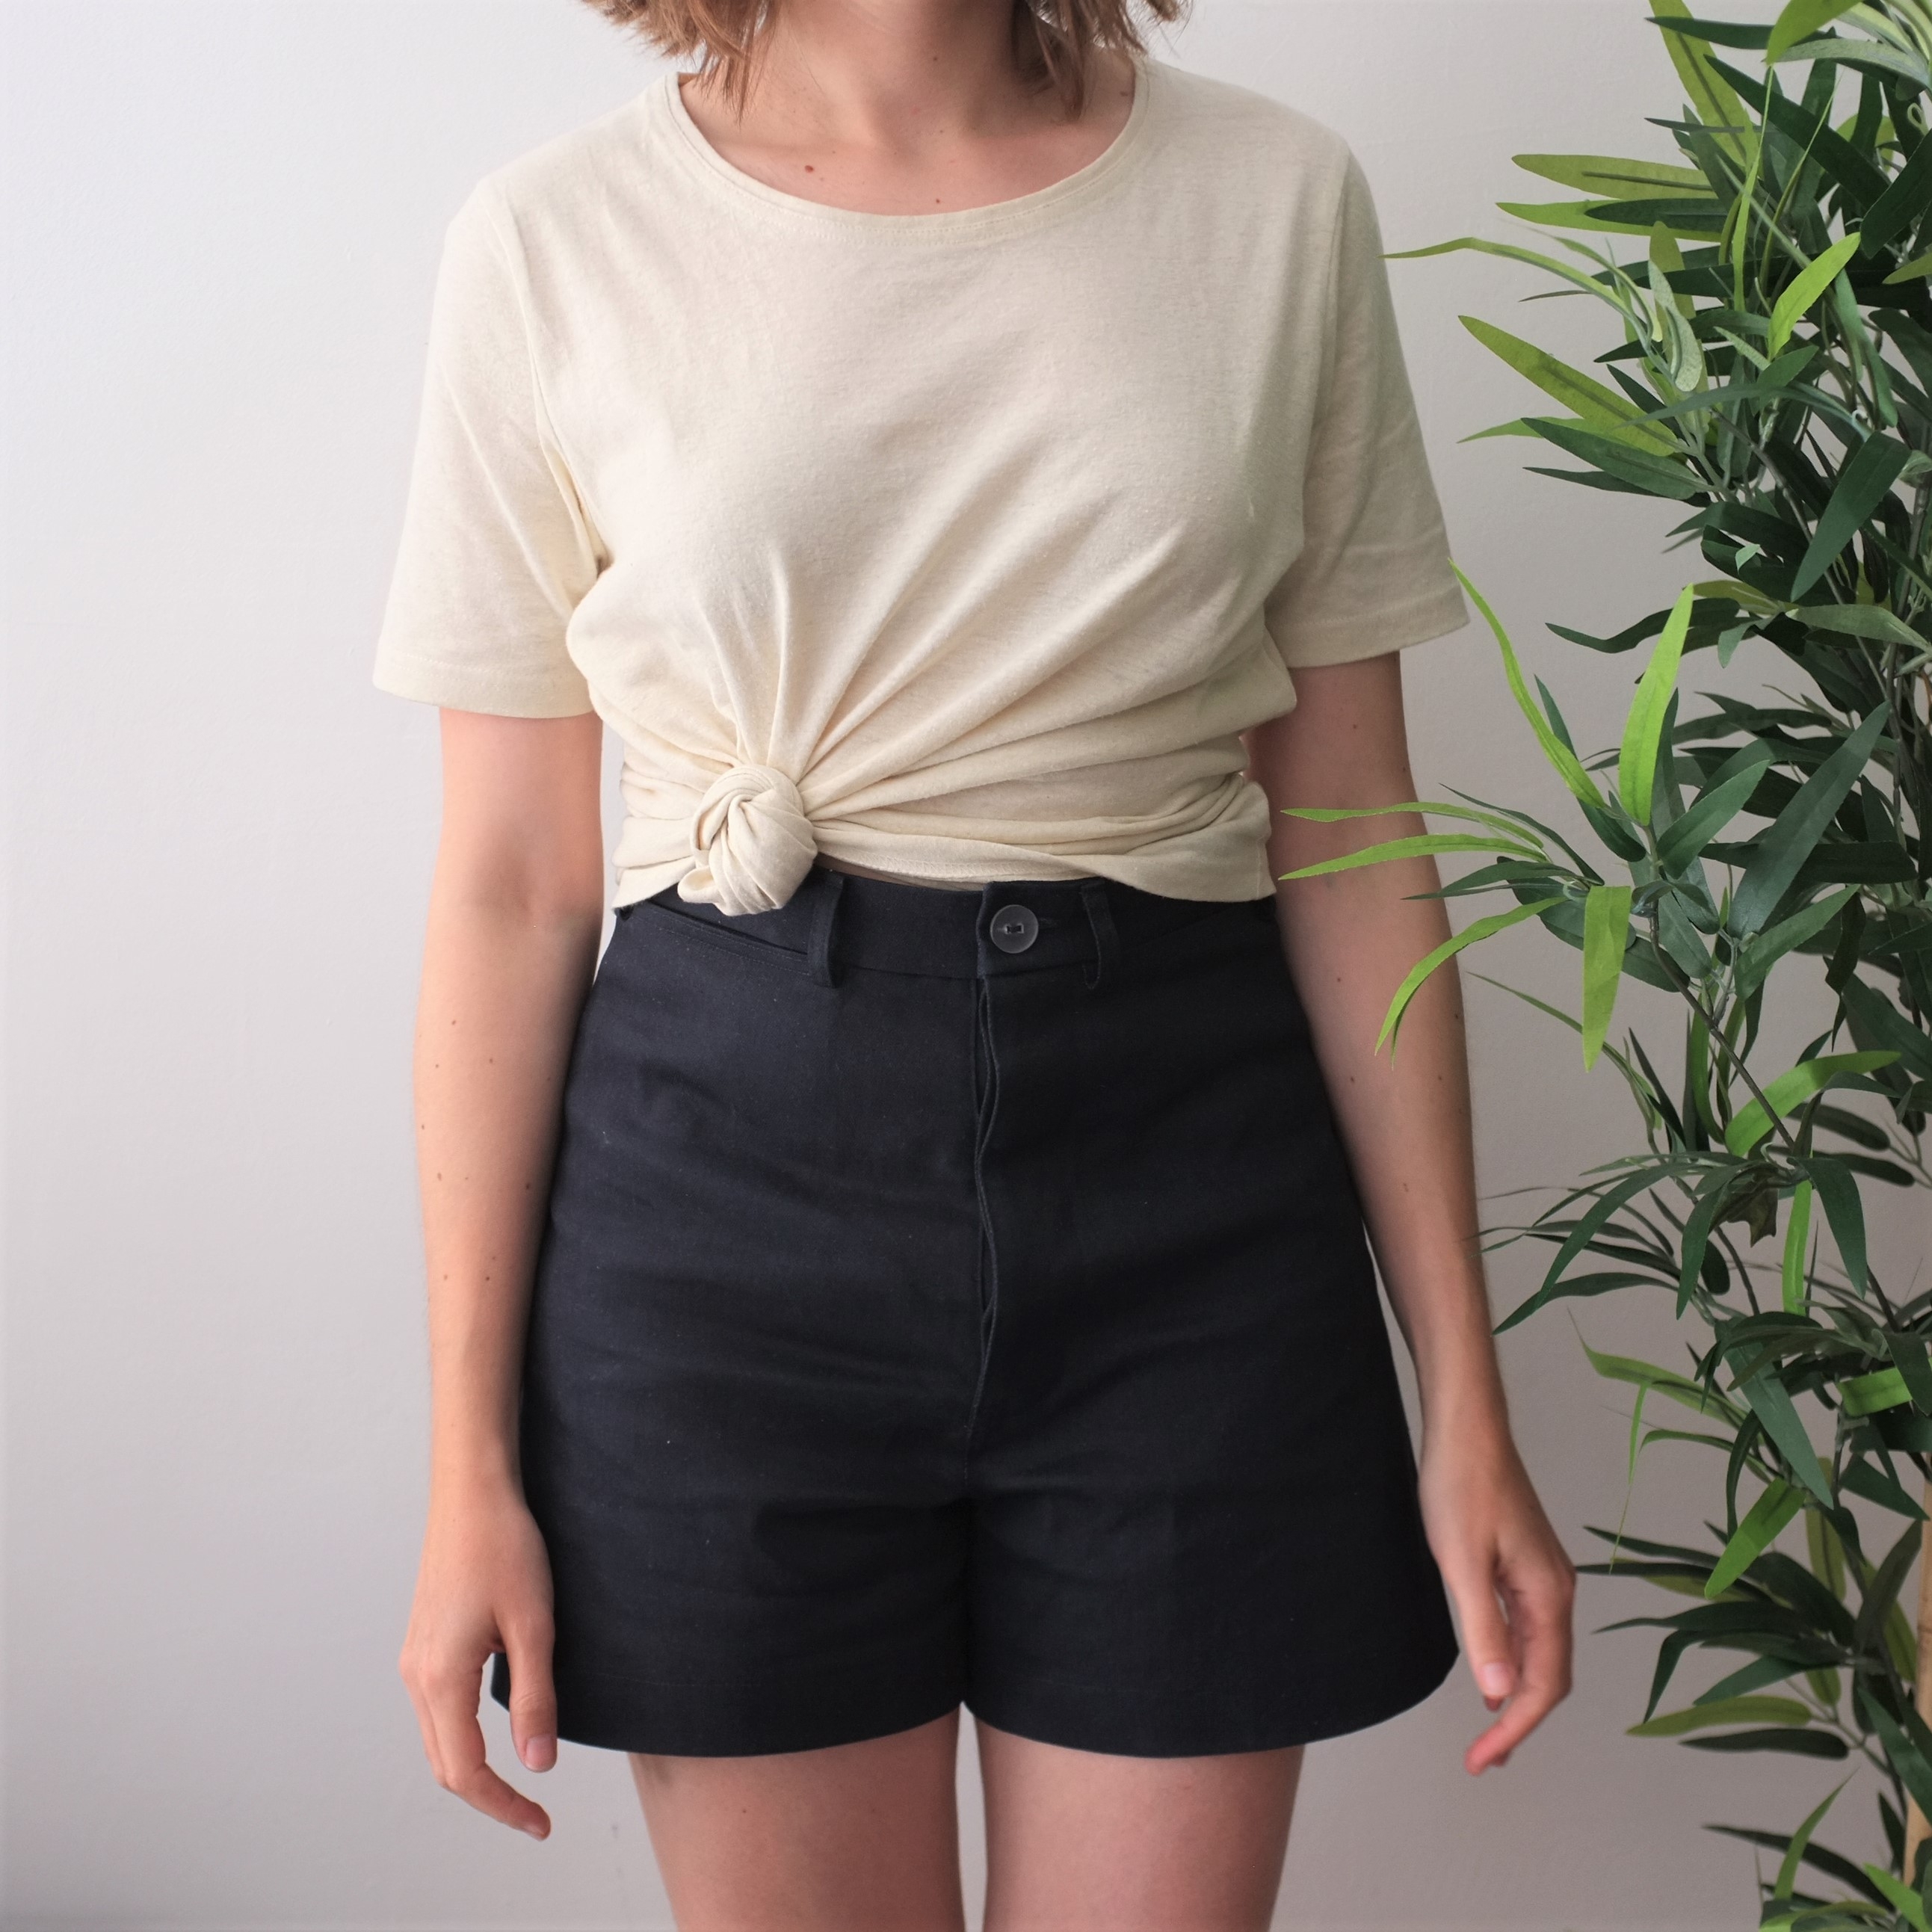
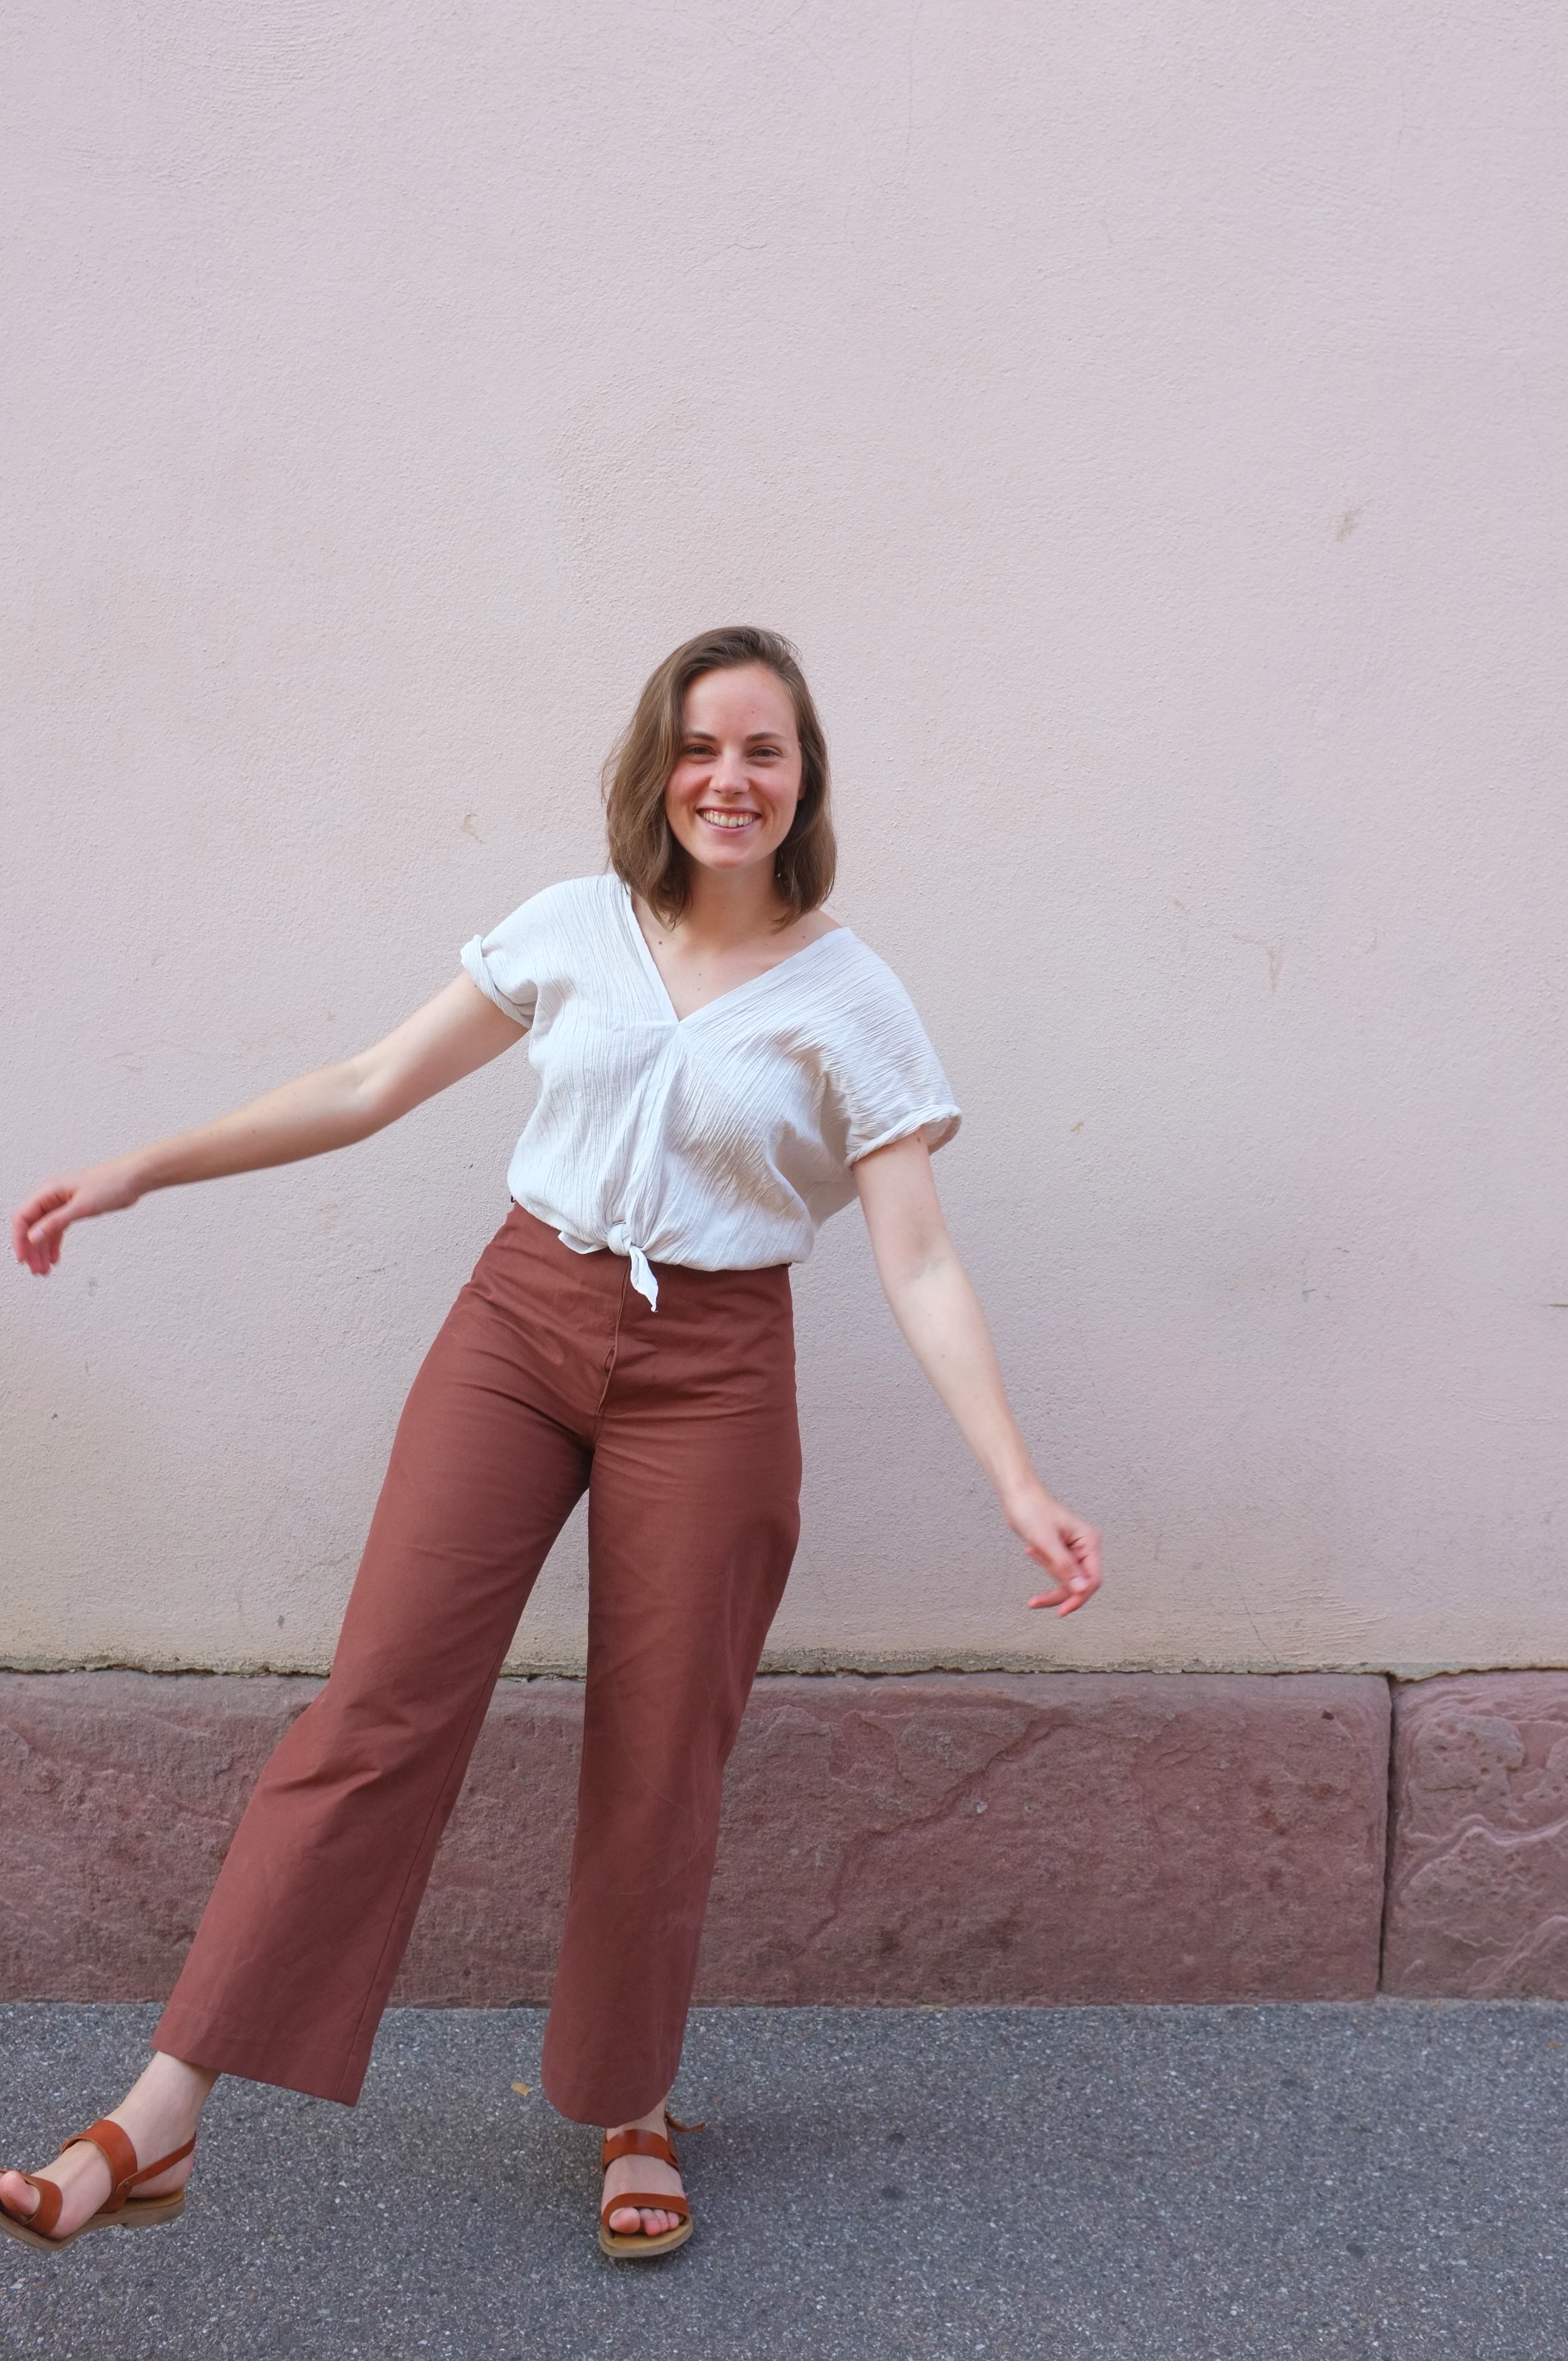
I did not have a vision for the cropped version in terms of colour. Initially I wanted to make them in some navy twill I had in my stash but the fabric basically disintegrated in the wash. While I was annoyed at the quality of the fabric and the waste, I’m glad I realised the issue before sewing it up. Just imagine, it could have ripped while I was wearing it! Due to the lack of bottom weight fabric in my stash I had to go to the fabric shop (the usual in my home town) to find something suitable. And there it was, the perfect medium weight twill in the most gorgeous brick/terracotta colour; not too thick but slightly stiff, ideal! Lately I have been drawn to all the earthy browns which is a departure from my normal colour palette but works perfectly with the rest of my wardrobe.

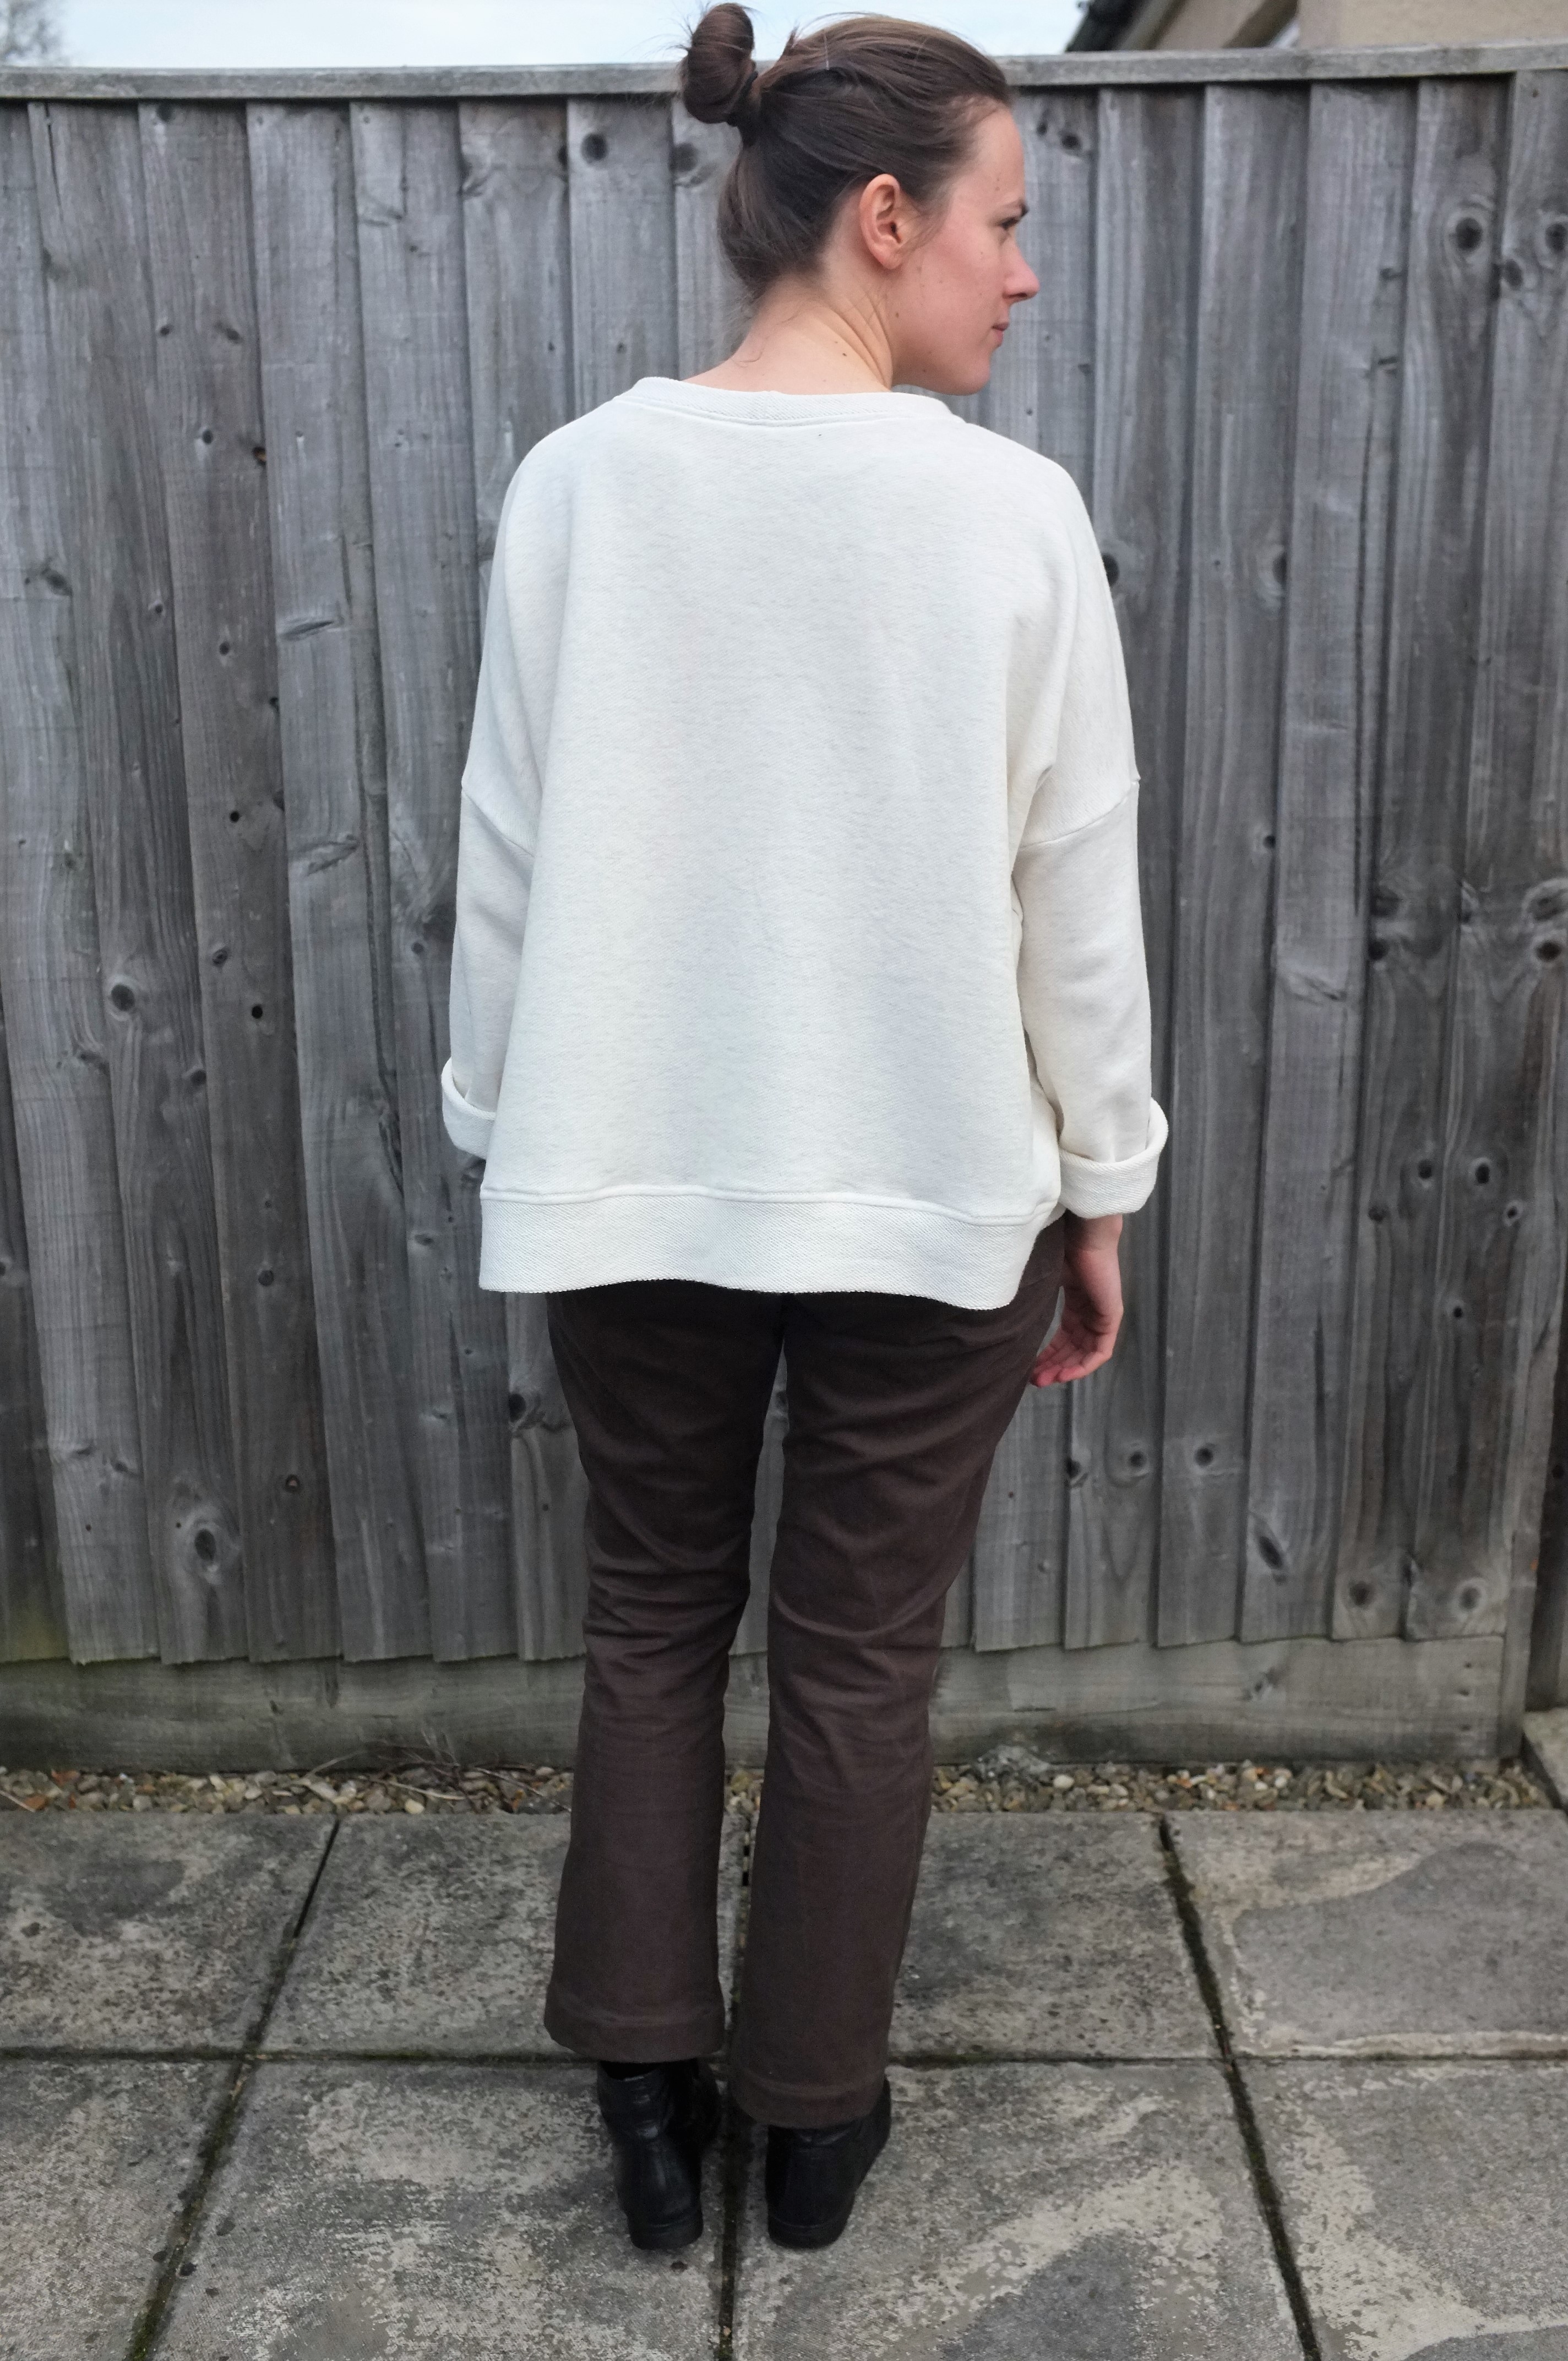
The construction of the trousers was very straight forward. Since I had already sewn the shorts version I knew all the construction techniques and changes I had to make, which included the following:

  • going down by one size to a 10
  • deepening the back darts
  • removing 2 cm from the front rise
  • swapping the straight waist band for a curved one with a centre back seam

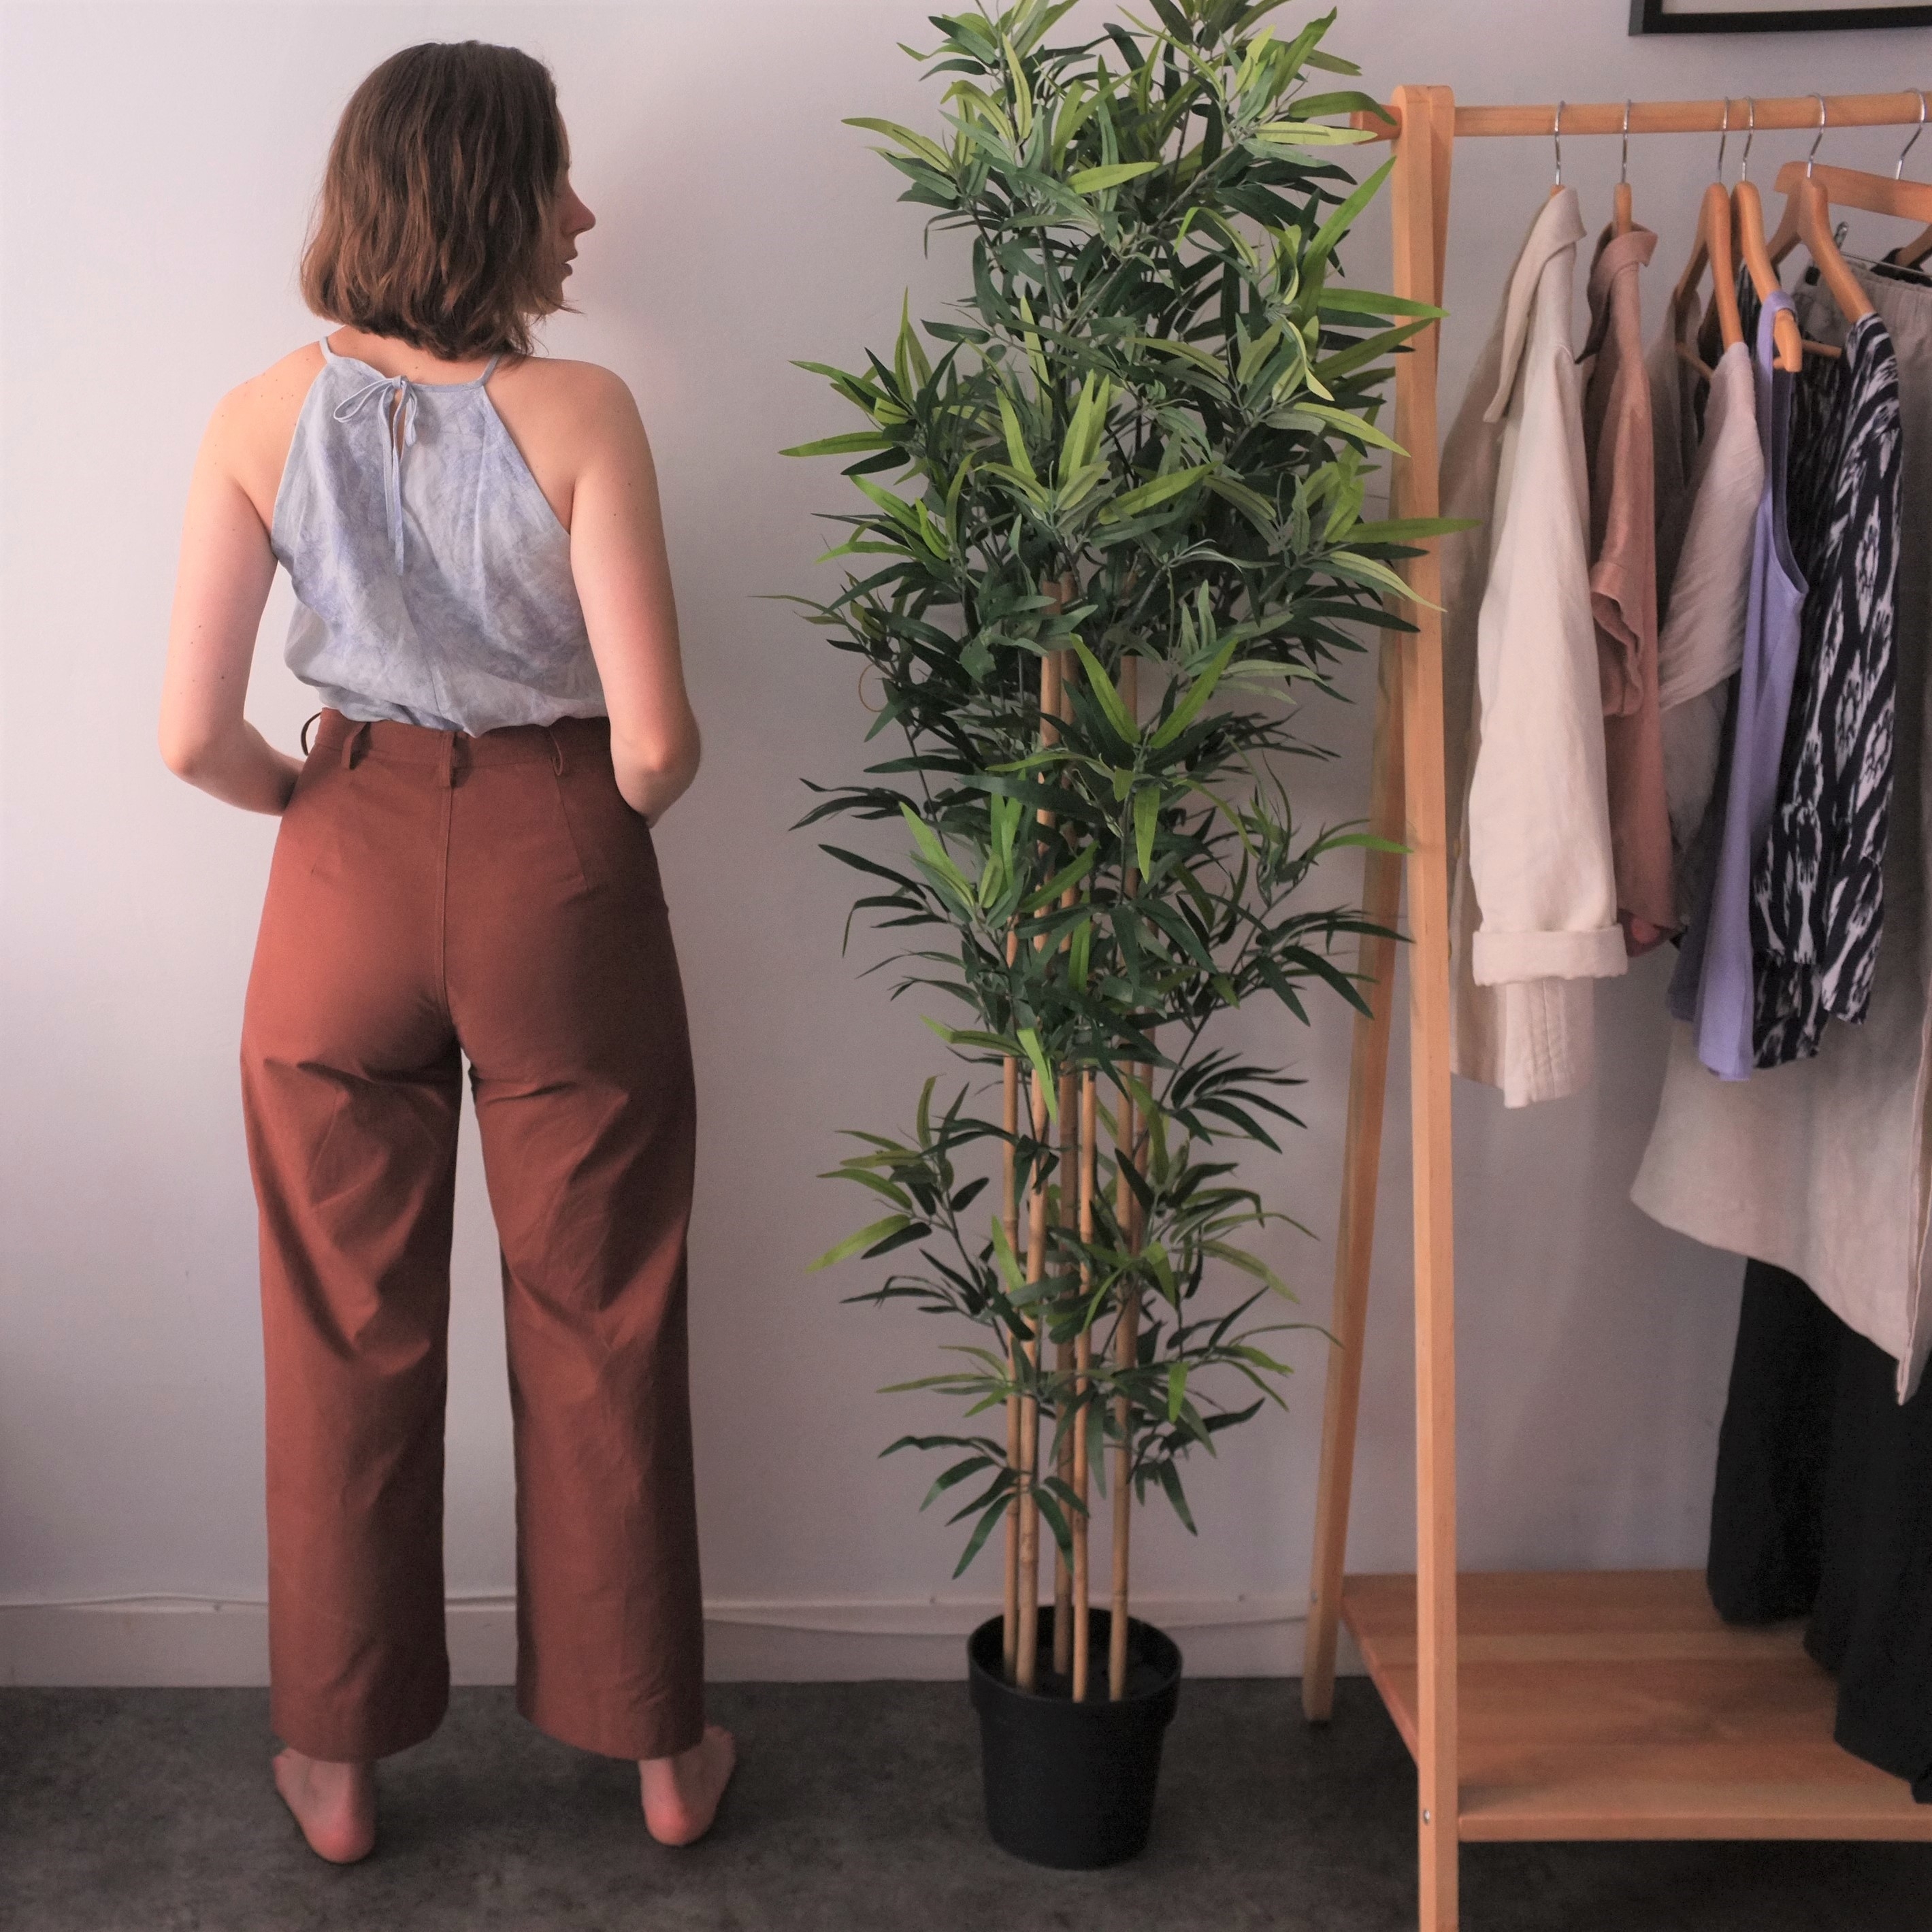
All these changes were easy to make, but massively improved the fit. The amazing thing is that this pattern does not have any side seams but still it was possible to make these fit on my pear shape figure. Amazing!

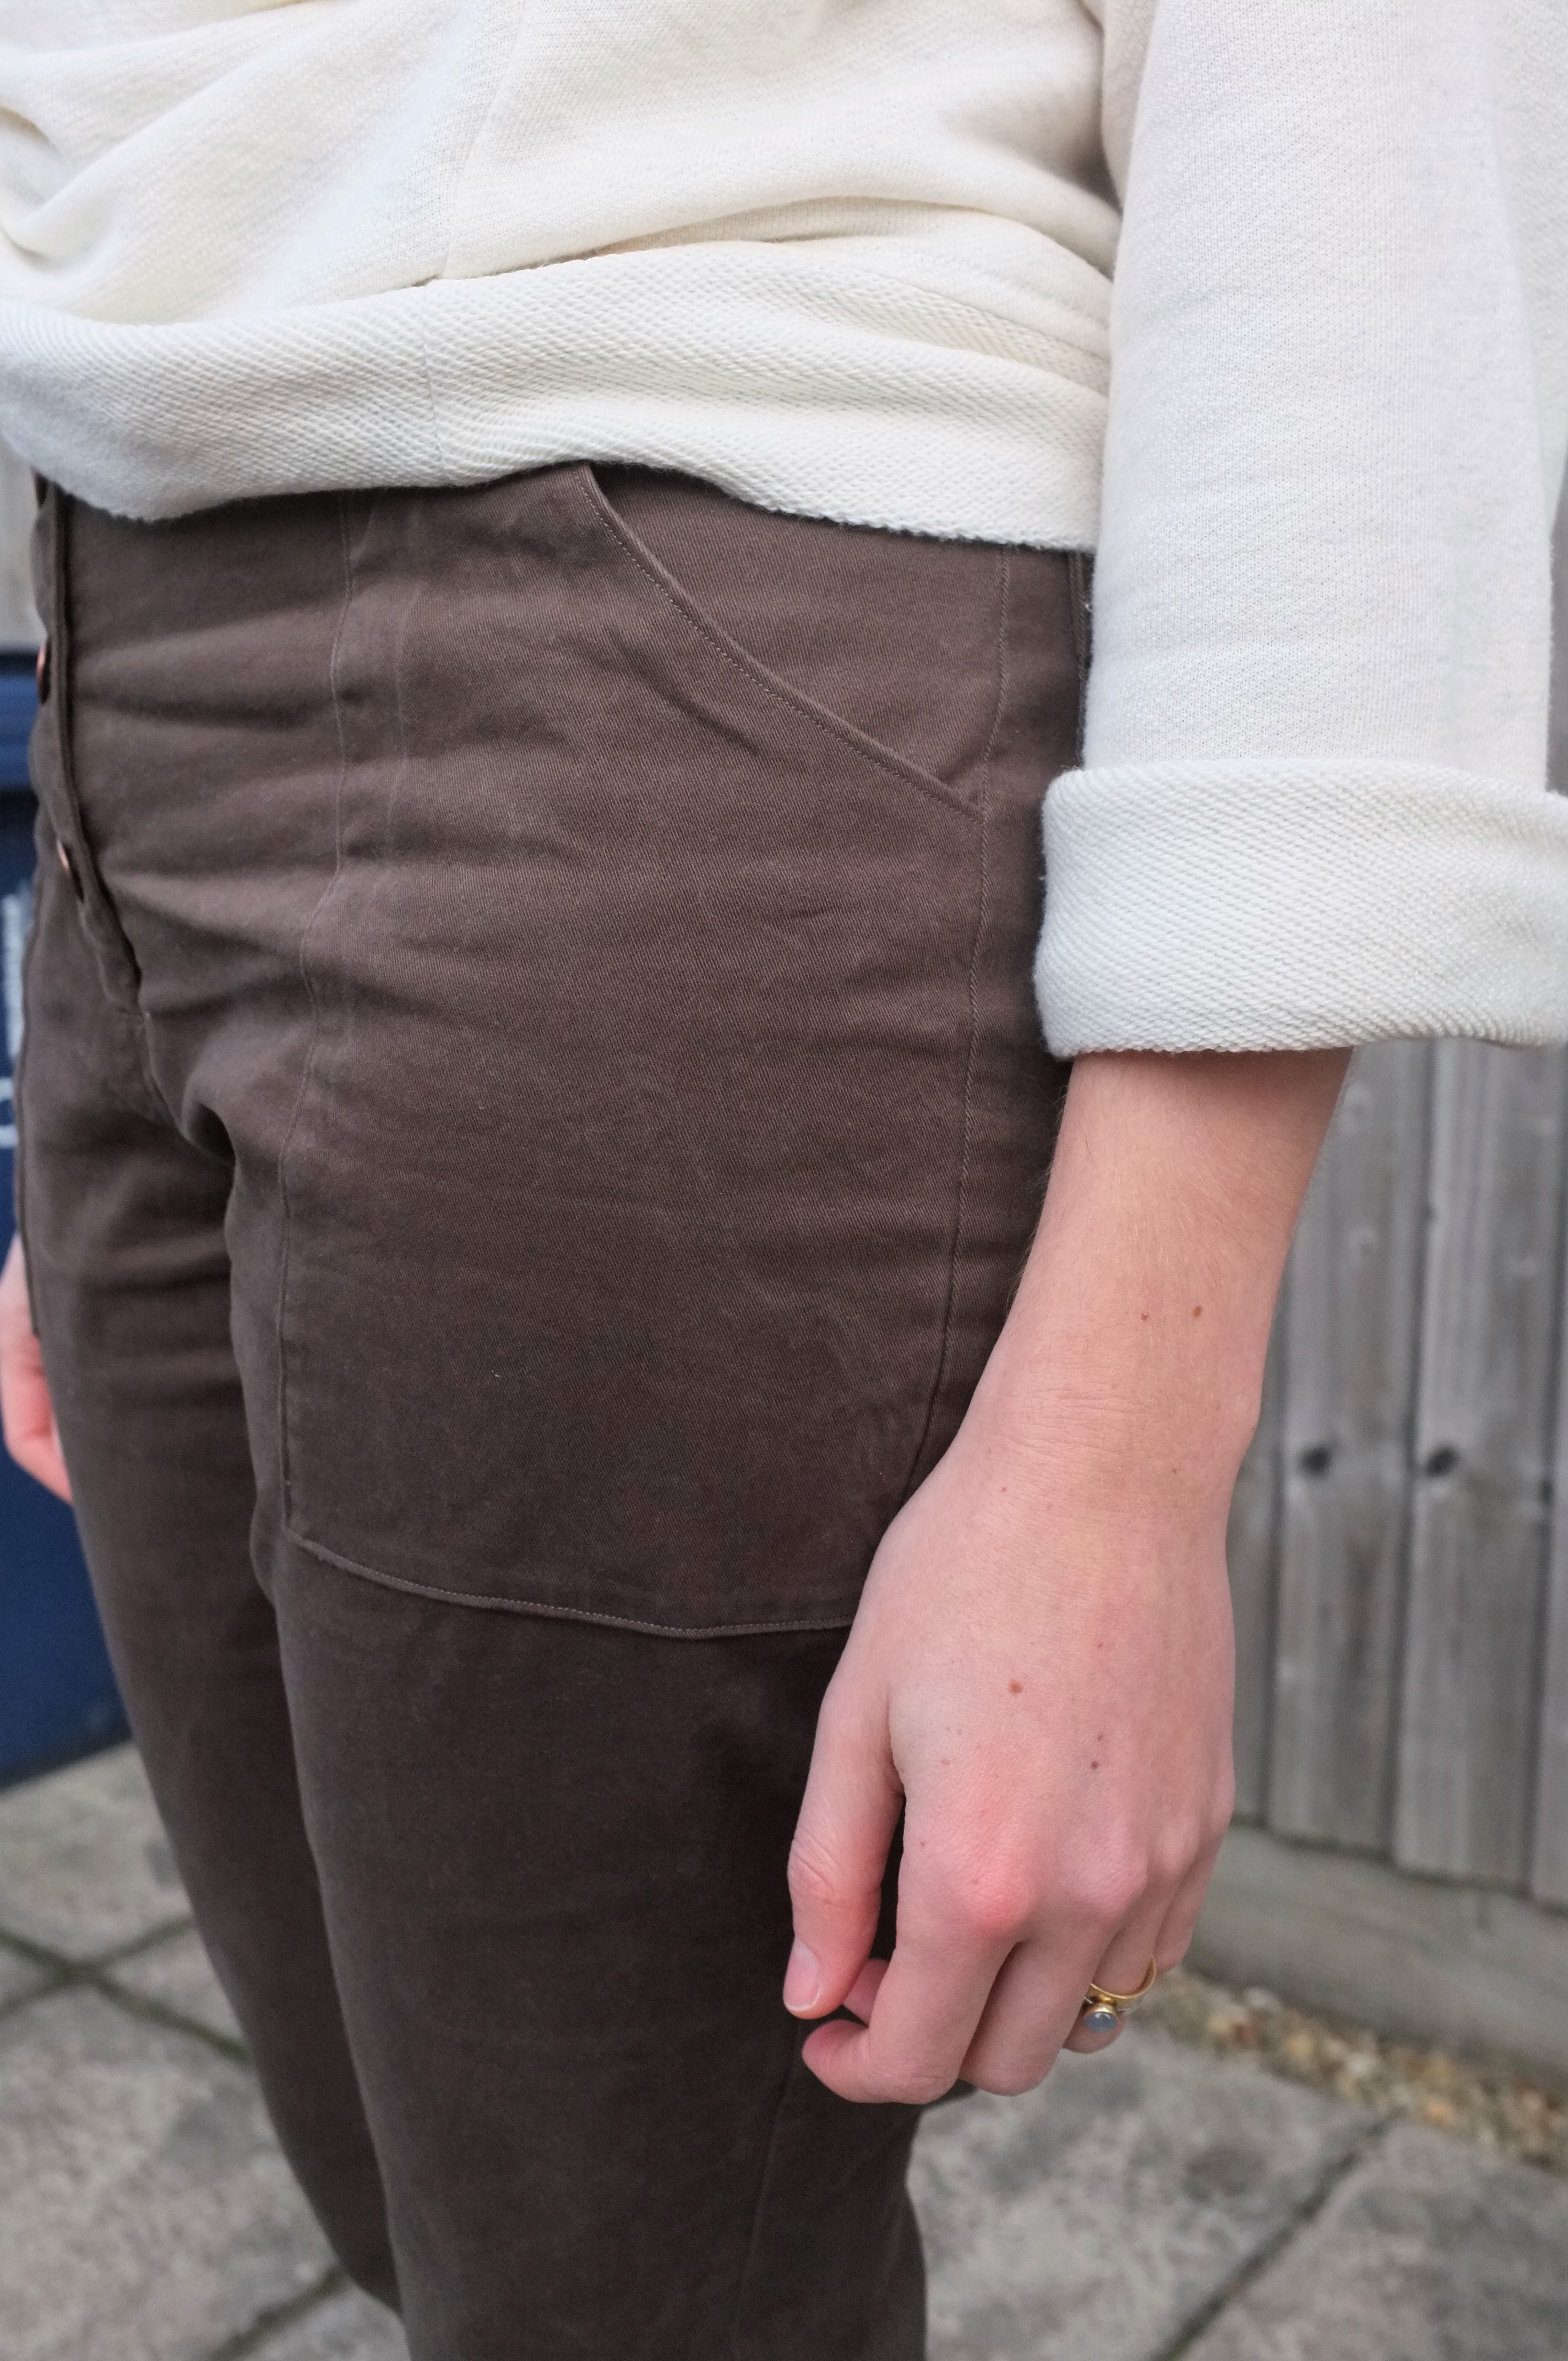
The construction of these are a lot of fun too (thanks to very detailed instructions). I love how the button fly front comes together. The only change I made was to add horizontal seams on the inside to give it more stability. The pockets hidden at the waist seam are such a fun detail! While maybe not the most practical to reach into, they are able to hold a phone (proof below).

Since my overlocker is currently in storage, I finished the seams with a zigzag stitch and top stitched them as instructed. The only mistake I made was to not catch the belt loops in the waistband seam (I was so focused on getting the waistband fit right) but it didn’t bother me enough to unpick it. The pocket bags are from a striped cotton and the buttons are the results of my laser cutting adventures the other week. They are frosted plexiglass and actually work perfectly for this style as they don’t add too much bulk at the button front.

So as you might have guessed from the pictures, or my spam on Instagram, it is love! This is one of these styles that I always admired on other people but wasn’t sure I could make work for me. In the end they feel very me. I love wearing them and even my husband doesn’t mind them too much. I guess that’s because they are more tight-fitting than my other “clown trousers” (as he calls them).

The fit, with only a few tweaks is great (at least in my opinion), tight enough through the hips, and no gaping at the waist! Also the fabric turned out to be perfect for the style. The outdoor pictures were taken after a full day of wear and the wrinkles aren’t too bad, the fabric holds the shape of the legs really well and most importantly they don’t bag out through wear.

I’m loving these so much that I have included them in my Summer 10×10. The idea of the 10×10 challenge is to choose 10 items of clothing and wear them in 10 outfits over 10 days (for my picks and more details see my previous blog post). I hope this challenge helps me to become more adventurous with styling my me-mades and better figuring out my style, which has been evolving a lot lately.

So, I’m probably the last one to get on the Persephone Pants train, but I’m so glad I did! I’m already planning another pair maybe in a natural white bull denim or canvas?

Landers and a cosy sweater

Hi everyone, it’s been a while. I’ve been struggling with the usual winter blogging issues: no daylight during the week and a lot of grey weekends which just didn’t give me a chance to get decent blog pictures. So today we finally managed to take a couple of pictures of a new outfit: an oversized sweatshirt and a pair of Lander pants.

Let’s start with the sweatshirt. When I was fabric shopping on Goldhawk road two weeks ago I came across this french terry at Misan West. I’m always on the look-out for cosy knits which are surprisingly hard to find. But this one was perfect, it’s super soft and the perfect ivory colour. It’s definitely on the lighter side, but thus perfect for summer and it works for layering in winter. My initial intention was to make a cardigan but then I realised that the fabric would be perfect for creating a copy of one of my favourite sweaters. It’s a white cotton cable knit sweater which I bought back in 2012 when I was studying in Copenhagen. It will have to be retired soon, but I adore the oversized shape which just always reminds me of the effortless Danish style. So I traced of the shape which is super simple. Basically it’s just a big rectangle for the body and smaller ones for the sleeves. It could probably be re-created by using the Grainline Studio Hemlock Tee.

The construction was quick and easy. I assembled the pieces with a stretch stitch on my sewing machine and finished the seams on my overlocker. The sleeve hems are just overlocked and then rolled up. The bodice hem and the neckline are finished with bands using the loopy side of the fabric, to mirror the rolled up sleeves. The neckline did need two tries to sit nicely. As the fabric is not very stretchy my first attempt of the neckline just didn’t lie flat. I decided to re-cut it with a slightly shorter length but twice as wide. Once attached I folded the neckband under and secured it with top-stitching around the neckline. This gives the neckline a nice structured look due to the 4 layers of fabric.

The final sweater has a lot of volume which I love but I do have to roll up the sleeves quite high to make sure I don’t dip them in food etc. So for a future iteration I might play around and slim them down a little. All in all this sweater is very close to its inspiration and will be really good replacement. Isn’t it great how sewing allows you to copy your favourite clothes? That way it is slightly easier to say goodbye to well-worn pieces.

Now let’s talk about these trousers, the True Bias Lander Pant. When this pattern came out it was love at first sight and judging by the reaction of the sewing community I wasn’t the only one. However, in real life our relationship turned out to be a little bit more complicated… But let’s start at the beginning. I picked up a 3 m remnant of this khaki green twill at a trousers fabric wholesaler in my hometown over Christmas. It’s not a colour I usually wear but I realised that it goes very well with my colour palette (especially my many blush pieces) and I thought it would be perfect to test the Lander pattern. The fabric is a medium weight with a little bit of stretch, which the pattern doesn’t call for but I thought it couldn’t hurt as I read a couple of reviews where people struggled to get the fit tight but comfortable. According to the size chart my waist was slightly smaller than an 8 and my hips slightly larger than a 12. I decided I could get away with a 12 in the hips due to the stretch in the fabric and that I could always adjust the fit in the waist through the side seams and the waistband.

The construction was really quick and straight forward thanks to the instructions being very thorough. The button closure really saves a lot of time compared to a full zip fly. And the exposed buttons are really a nice feature. I love the brass colour of my jeans buttons against the green. The only thing slightly odd was the construction of the front pockets. You are supposed to line them by attaching the lining right side to right side to the pocket pieces and then turn them inside out. Then the whole thing is being top stitched to the front. While this helps with neat corners and pocket edges, it requires a lot of precision for the lining not to show at the seams. I did read the instructions in advance and realised that ideally I would need a lining in the same colour of the fabric. As self lining would have been too bulky and I couldn’t find a lining fabric in my stash in the right colour, I went with a scrap of ivory silk in the end, making sure to be extra precise with the pockets.

Then came the fitting and this is where the struggles started. Kelli includes a 1″ seam allowance at the outer leg seam, which in theory should make fitting easy, but in my case the trousers turned out way too big. Not only through the waist and hips but also in the legs there was a massive amount of volume. In combination with the colour, they gave off a serious army trousers vibe that I didn’t like at all. To avoid any rash decisions I decided to wear them around the house for a couple of days to see if I just needed to get used to the volume. I also went through the #landerpant hashtag to see how it was fitting on other people. The trousers are definitely intended to be loose from the hips, but I realised that I was most drawn to versions that were closer fitting through the thighs than mine. I also realised that my fabric was potentially too thin, which led to fabric pooling below my bum which probably would not occur in a very structured denim or twill like the samples.

So there was no way around it, the trousers had to be taken in. I took out as much as I could from the side seams but was restricted by the back pockets, which I cut out in the medium size. I also slimmed down the legs through the thighs but let them flare out again at the hem. I used the original straight waistband but could have benefited from drafting a curved waistband as it’s gaping slightly at the back.

Then I had to decide on the length. I had cut the full boot length without adding any additional length. While I am an average 1.70 m I have disproportionately long legs, but since the pattern called for a very wide hem, I thought I would have some wiggle room. Once it came to hemming though it turned out that even with a narrow hem, the trousers would be slightly too short (the story of my youth). I still hemmed them to see if I could get used to it but it just didn’t look intentional. After letting them sit for another couple of days I decided to shorten the legs a good 6 cm by just folding up the hem twice and top-stitching it. Now they are probably closer to the ankle length view of the pattern. I’m still not 100% sold, but I have worn them out and they turned out to be great for a rainy day, no water creeping up your legs.

So what’s my final verdict? It’s definitely a great pattern but it took a lot of work to get them to a stage where I would actually wear them. Unfortunately it’s not love, yet. I will see how I feel about them in summer, with some lighter shoes and bare ankles. When I make them again (I’ll definitely make the shorts, no leg drama foreseen there) I will size down and use a thicker fabric. I’ll also use the smaller size back pockets and a curved waistband. Then I might get closer to my original vision for these trousers, the perfect retro, high-waisted trousers. Until then I’ll just live through all the cool people out there, that are rocking their Lander pants. Until next time.

Flint and Ruby

Hi everyone, I am hoping you are all heaving a lovely autumn. I just got back from a week in Germany for a wonderful wedding. For everyone who read my last post, yes I did wear the orange dress in the end. And while it definitely stood out amongst all the navy suits and dresses everyone else was wearing, I really enjoyed wearing something colourful. This orange is really growing on me. Back here in the UK we are having quite a gloomy weekend. It’s becoming more and more difficult to get good light for photos, so please ignore the slightly weird colours in the pictures below.

This week I have another great pairing of indie patterns for you: the Tessuti Ruby Top and the Megan Nielsen Flint in the culottes length. Both of these are patterns that you can’t really escape in the online sewing world and I was really intrigued to try them. Let’s start with the culottes. I made the Flint before in the shorts length and really liked them. It’s a pattern with lovely details and comes together really quickly. From the beginning though I knew I wanted to try the culotte length as well. While I have made a culotte jumpsuit before which I then converted to culotte trousers, I never really got a lot of wear out of them. Due to the shiny fabric, they might be just a little bit too fancy for everyday wear so I wanted to make a more casual version. The fabric, as so often, came from my favourite shop in my hometown and is a drapey linen chambray,  perfect for this style of trousers. On my last pair I wasn’t 100% sold on the pleats at the front, so I followed the tutorial on Megan’s blog and converted them to a flat front. I love how sleek it looks! I also opted for the button closure this time, with both of the buttons facing to the inside to further add to the minimalist look. This now makes them a lot easier to pair with tops that are not tucked in.

In terms of sizing I did the same as with my Flint shorts. I made a size M, taking them in by roughly 3 cm in the waist. I followed the instructions for construction for everything except the crotch seam. You are told to clip the seam along the curve, but on my shorts I’m afraid the seam will tear due to the fraying fabric. So this time I serged the seam and topstitched it down for a mock flat felled seam. This feels a lot more secure. Just before hemming, I tried them on and decided to take 5 cm from the width of the leg; it felt like too much fabric for my taste. I hemmed the culottes at the length indicated in the pattern.

So what’s the verdict? My husband calls them my clown pants… And while I rarely listen to him for fashion advice, I do feel a little bit frumpy in them. I’m not sure if it’s the length (maybe they need to be a tad longer) or the amount of fabric in the leg that I’m just not used to. Also styling them for autumn is a little bit difficult. I might have to wait until next summer for the final verdict. The pattern itself is really lovely though.
I’m probably not the only one who fell in love with this Liberty of London silk georgette Jellie when Papercut Patterns launched their latest collection and used it for their sample of the Kobe Top. It’s sold by The Fabric Store; ironically I couldn’t find it here in the UK. I had never ordered from them before and this fabric alone would not have justified getting this shipped from New Zealand. However, my husband only wears merino T-shirts and I decided to order some of their merino fabrics to make him some and this fabric slipped into the shopping basket.

The fabric is as beautiful in real life as on the screen but very delicate and sheer. I knew I would have to be careful with the construction and chose a simple pattern. I liked the idea of pairing this delicate silk with a modern shape to make sure I would get some wear out of it. After some deliberation I settled on the Tessuti Ruby Top. I like the cutaway armholes and the dart-less flared shape. To get the fit right, I made a quick muslin from cotton scraps. The fit was quite good, I only had to shorten the straps by 2 cm. For the final version I also shortened the hem a bit. I made it even shorter in the front so I would be able to wear it with high waisted skirts and trousers without having to tuck it in. In terms of construction I decided to add a centre back seam which would make constructing the keyhole easier.

Happy with the fit I moved on to the silk. I used spray starch against the shiftiness but it still was difficult to get everything straight. I knew pattern matching the back seam would almost be impossible, so I decided to ignore it and just mirror the two sides. I’m happy enough with how it looks. In the end I will never really see it… I fully lined it with some white viscose voile that I had in my stash. This gives it enough opacity and also helps with a clean finish on the inside. The seams are finished with my serger, which handled the silk really well. The hem is serged and then folded up once. Even though I let the top hang for a couple of days and was very careful when I evened out the hem, it still looks a little wonky. I’m trying to embrace it, but I might have to re-do it at some point. Other than that I really like how this turned out. It’s lovely to wear and adds a nice pop of yellow to my work wardrobe.

Oh and this is how half of the pictures turned out from that photo shoot, it was a very windy day.