
After we attended the Sewing Weekender together, Lucy of SewEssential reached out to me and asked if I wanted to do a sponsored blog post, using a pattern and fabric of my choice from their website. I hadn’t ordered from their online shop before but when I browsed their shop I found the perfect pattern and fabric combo to make the black turtleneck that’s been on my sewing list for a while.
I own the Papercut Rise and Fall turtleneck pattern and while I like the turtleneck I made from it, the dropped shoulders and the loose fit don’t make it that great for layering. For this version I wanted something more form-fitting, which I could wear tucked into skirts or under dresses (I’m obsessed with that look lately, I just need to sew the perfect slip dress). The Kwik Sew K4069 pattern from the website fit the bill perfectly. If you want get yourself a copy or if you want to try another Kwik Sew pattern (SewEssential has a wide selection), all Kwik Sew patterns on the website are currently half price!
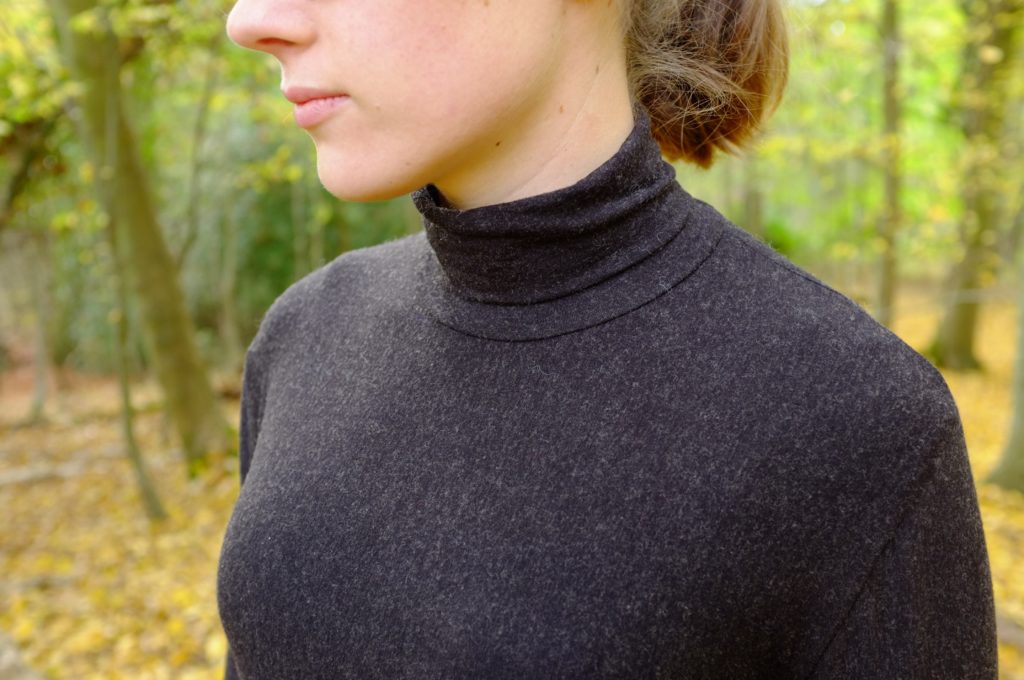
For maximum warmth I decided to pair the pattern with this John Kaldor Wool Mix Jersey in black. When the fabric arrived I was quite impressed with the quality. Due to the marl structure the colour is more a charcoal than a pure black, but it has a lovely weight and is very soft. I am quite sensitive when it comes to wool against my skin, but I have no problems wearing this. Before cutting into it I put it in the washing machine using the wool setting at 30 degrees to be able to machine-wash it in the future.
So far so good, then the drama began. Do you also sometime wonder, why you are able to finish a complete pair of jeans without a hiccup and then you sew the easiest thing in the world and everything goes wrong, making you feel like you’re the biggest sewing amateur in the world. No? Just me?
To be fair, it wasn’t all my fault. It did however start with a major mistake on my part. I started laying out the pattern pieces and had already cut out the front piece, when I realised I had cut it with the biggest stretch vertically and not sideways as the pattern specified. With the knit marl structure this is actually visible as the marl “stripes” are running vertically. (This is why you should never cut out fabric on a Friday evening after a long week of work!) Unfortunately I didn’t have enough fabric to cut that piece the other way around, so I forged ahead cutting all the pieces sideways, hoping that the vertical stretch would be enough for the negative ease of the pattern.
The next day I compared the pieces with an existing jersey top and it looked like there was plenty of room even with the limited amount of stretch. This however, should have made me suspicious. Where was the negative ease the pattern was talking about? Instead I assembled the bodice according to instructions, which meant that I could only properly check the fit after sewing up the final side seam for bodice and sleeves. I put it on and it was massive! Based on the size chart I had cut a size M. Unfortunately the pattern doesn’t include finished measurements, to double-check the sizing and in the end the turtleneck was too big, in particular the sleeves. Instead of taking the whole thing apart again to make it fit, I just decided to take in the side/sleeve seams by 4 cm. Fearing that there would be a similar problem for the turtleneck, I tried it on its own first, and as expected I had to take it in significantly (5 cm to be exact). Before attaching it to the bodice I made sure that it would still fit over my head. The smaller circumference of the tube meant, that it wouldn’t fit properly in the neck hole anymore. This I solved by taking in the shoulder seams slightly and stretching the neck tube while inserting it.
On top of these cutting and fitting issues my machine also decided to eat up the fabric twice. I used a stretch stitch for assembling it (before finishing the seams with my overlock) and the machine just didn’t like the back stitch in combination with the fabric. I didn’t manage to rip it off my machine without cutting small holes. Luckily it was in places where I could just re-sew the seam again, and now it’s not noticeable anymore.
After all the drama, I decided to not hem the sleeves and the bottom edge. I wanted to preserve the length and I haven’t mastered the perfect finishing technique for stretch yet on my normal sewing machine. Also I don’t really mind raw hems.
Despite all the issues I had, I have to say I love the finished turtleneck. The fit is now the one I was aiming for originally. The only issue are the shoulders, as they are slightly too wide, due to the fact that I started with a size too big for me. The pattern in theory follows the figure and once sewn in the right size it is very flattering. Thanks to it’s wool content the fabric is really warm and this turtleneck is the perfect layer for the cold November nights that we are having. The first outing was Bonfire Night, and it did a great job in keeping me warm.
P.S.: Everyone who reads Elena’s blog Randomly Happy, might realise they have seen this project before. It turns out that we both chose the exact same fabric and pattern for our collaboration with SewEssential. It was completely independent though and just a funny coincidence. She made a more relaxed version, if you haven’t seen it yet go check her’s out!


Note: The fabric and the pattern in this post were provided to me by SewEssential, in exchange for a blog post review, all opinions; however, are my own.