Blaire Shirt Number 1

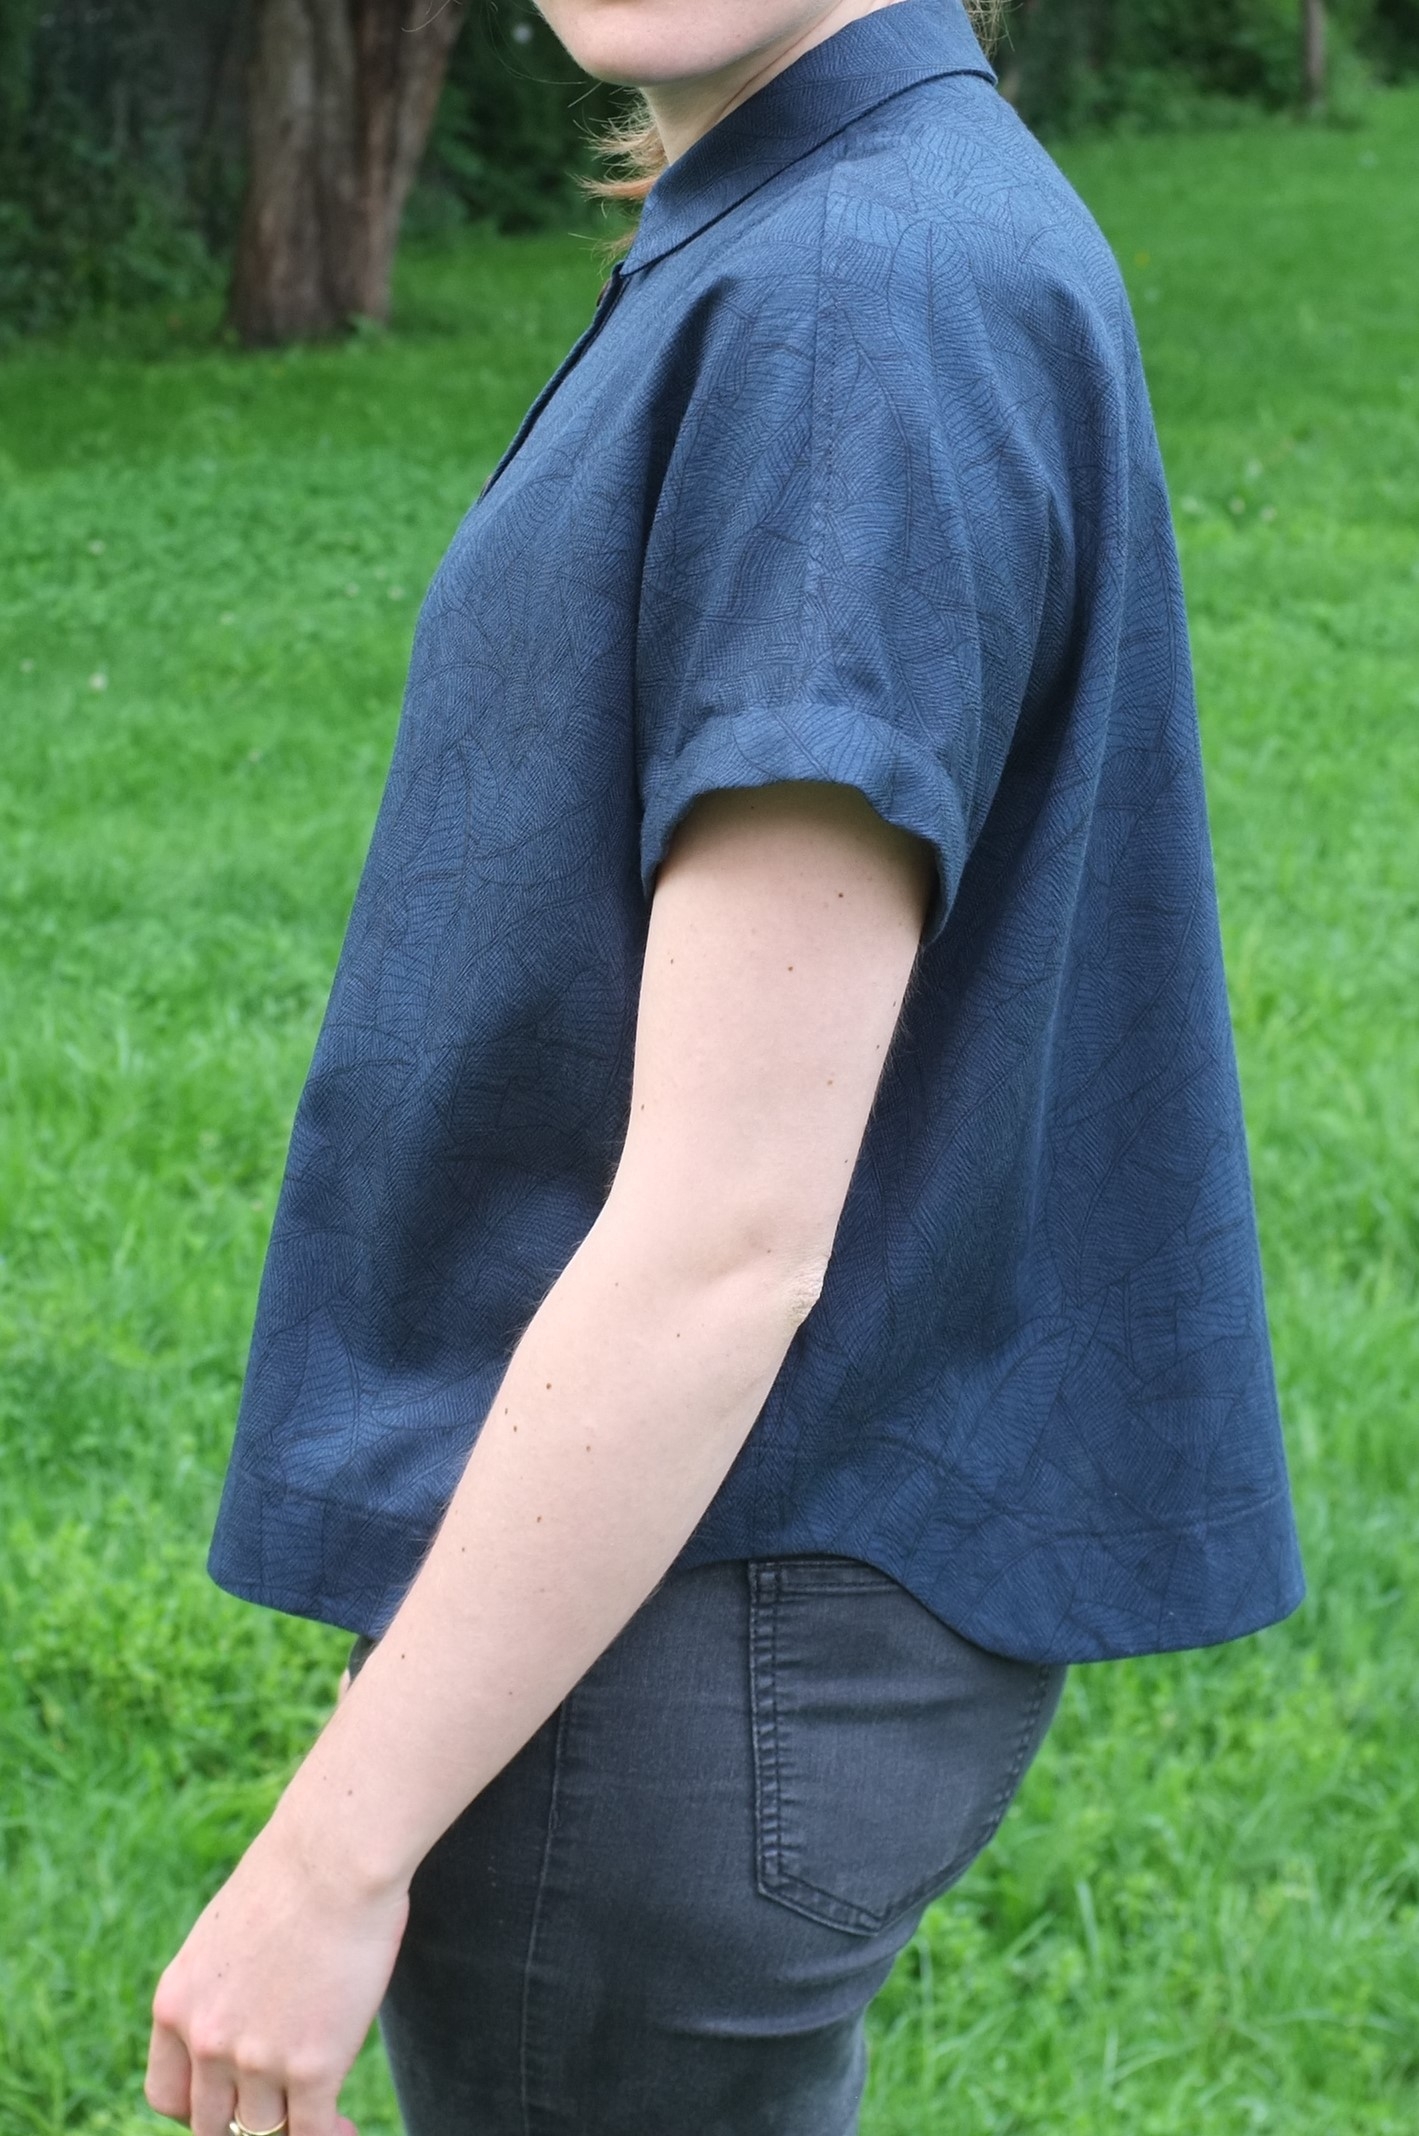
I didn’t officially take part in Me Made May this year but I used the month to analyse my day to day outfits and identify any gaps in my wardrobe. One thing that I’m definitely lacking are loose summer tops to wear with slim fitting shorts or trousers (my go-to silhouette). Lately I’ve been in particular drawn towards boxy button-up shirts. One of the patterns I’ve seen pop up a lot is the Style Arc Blaire Shirt & Dress and have to say I loved every version I’ve seen so far. So when I tried to decide what I should use this pretty Kokka Leaf Print fabric for (from John Lewis but unfortunately they don’t stock it anymore) I realised the Blaire would be the perfect match.

It was my first time using a Style Arc pattern. I love many of their designs and was curious to try them out. I already knew that their instructions are quite brief, but since i learned sewing with BurdaStyle patterns, I didn’t have any issues. It of course helped that I made a couple of shirts before.

I only had 1 metre of fabric, which is my default fabric length when I’m planning a top, but for a boxy shirt that was quite a stretch. To save fabric I omitted the horizontal seam at the waist and left off the overlay at the hem. Both are really cool design features if working with a stripe or different colours, but they would have been lost in this fabric. To have a decent hem at the side seams I lowered the curve by 12 cm, which still resulted in quite a pronounced curve.

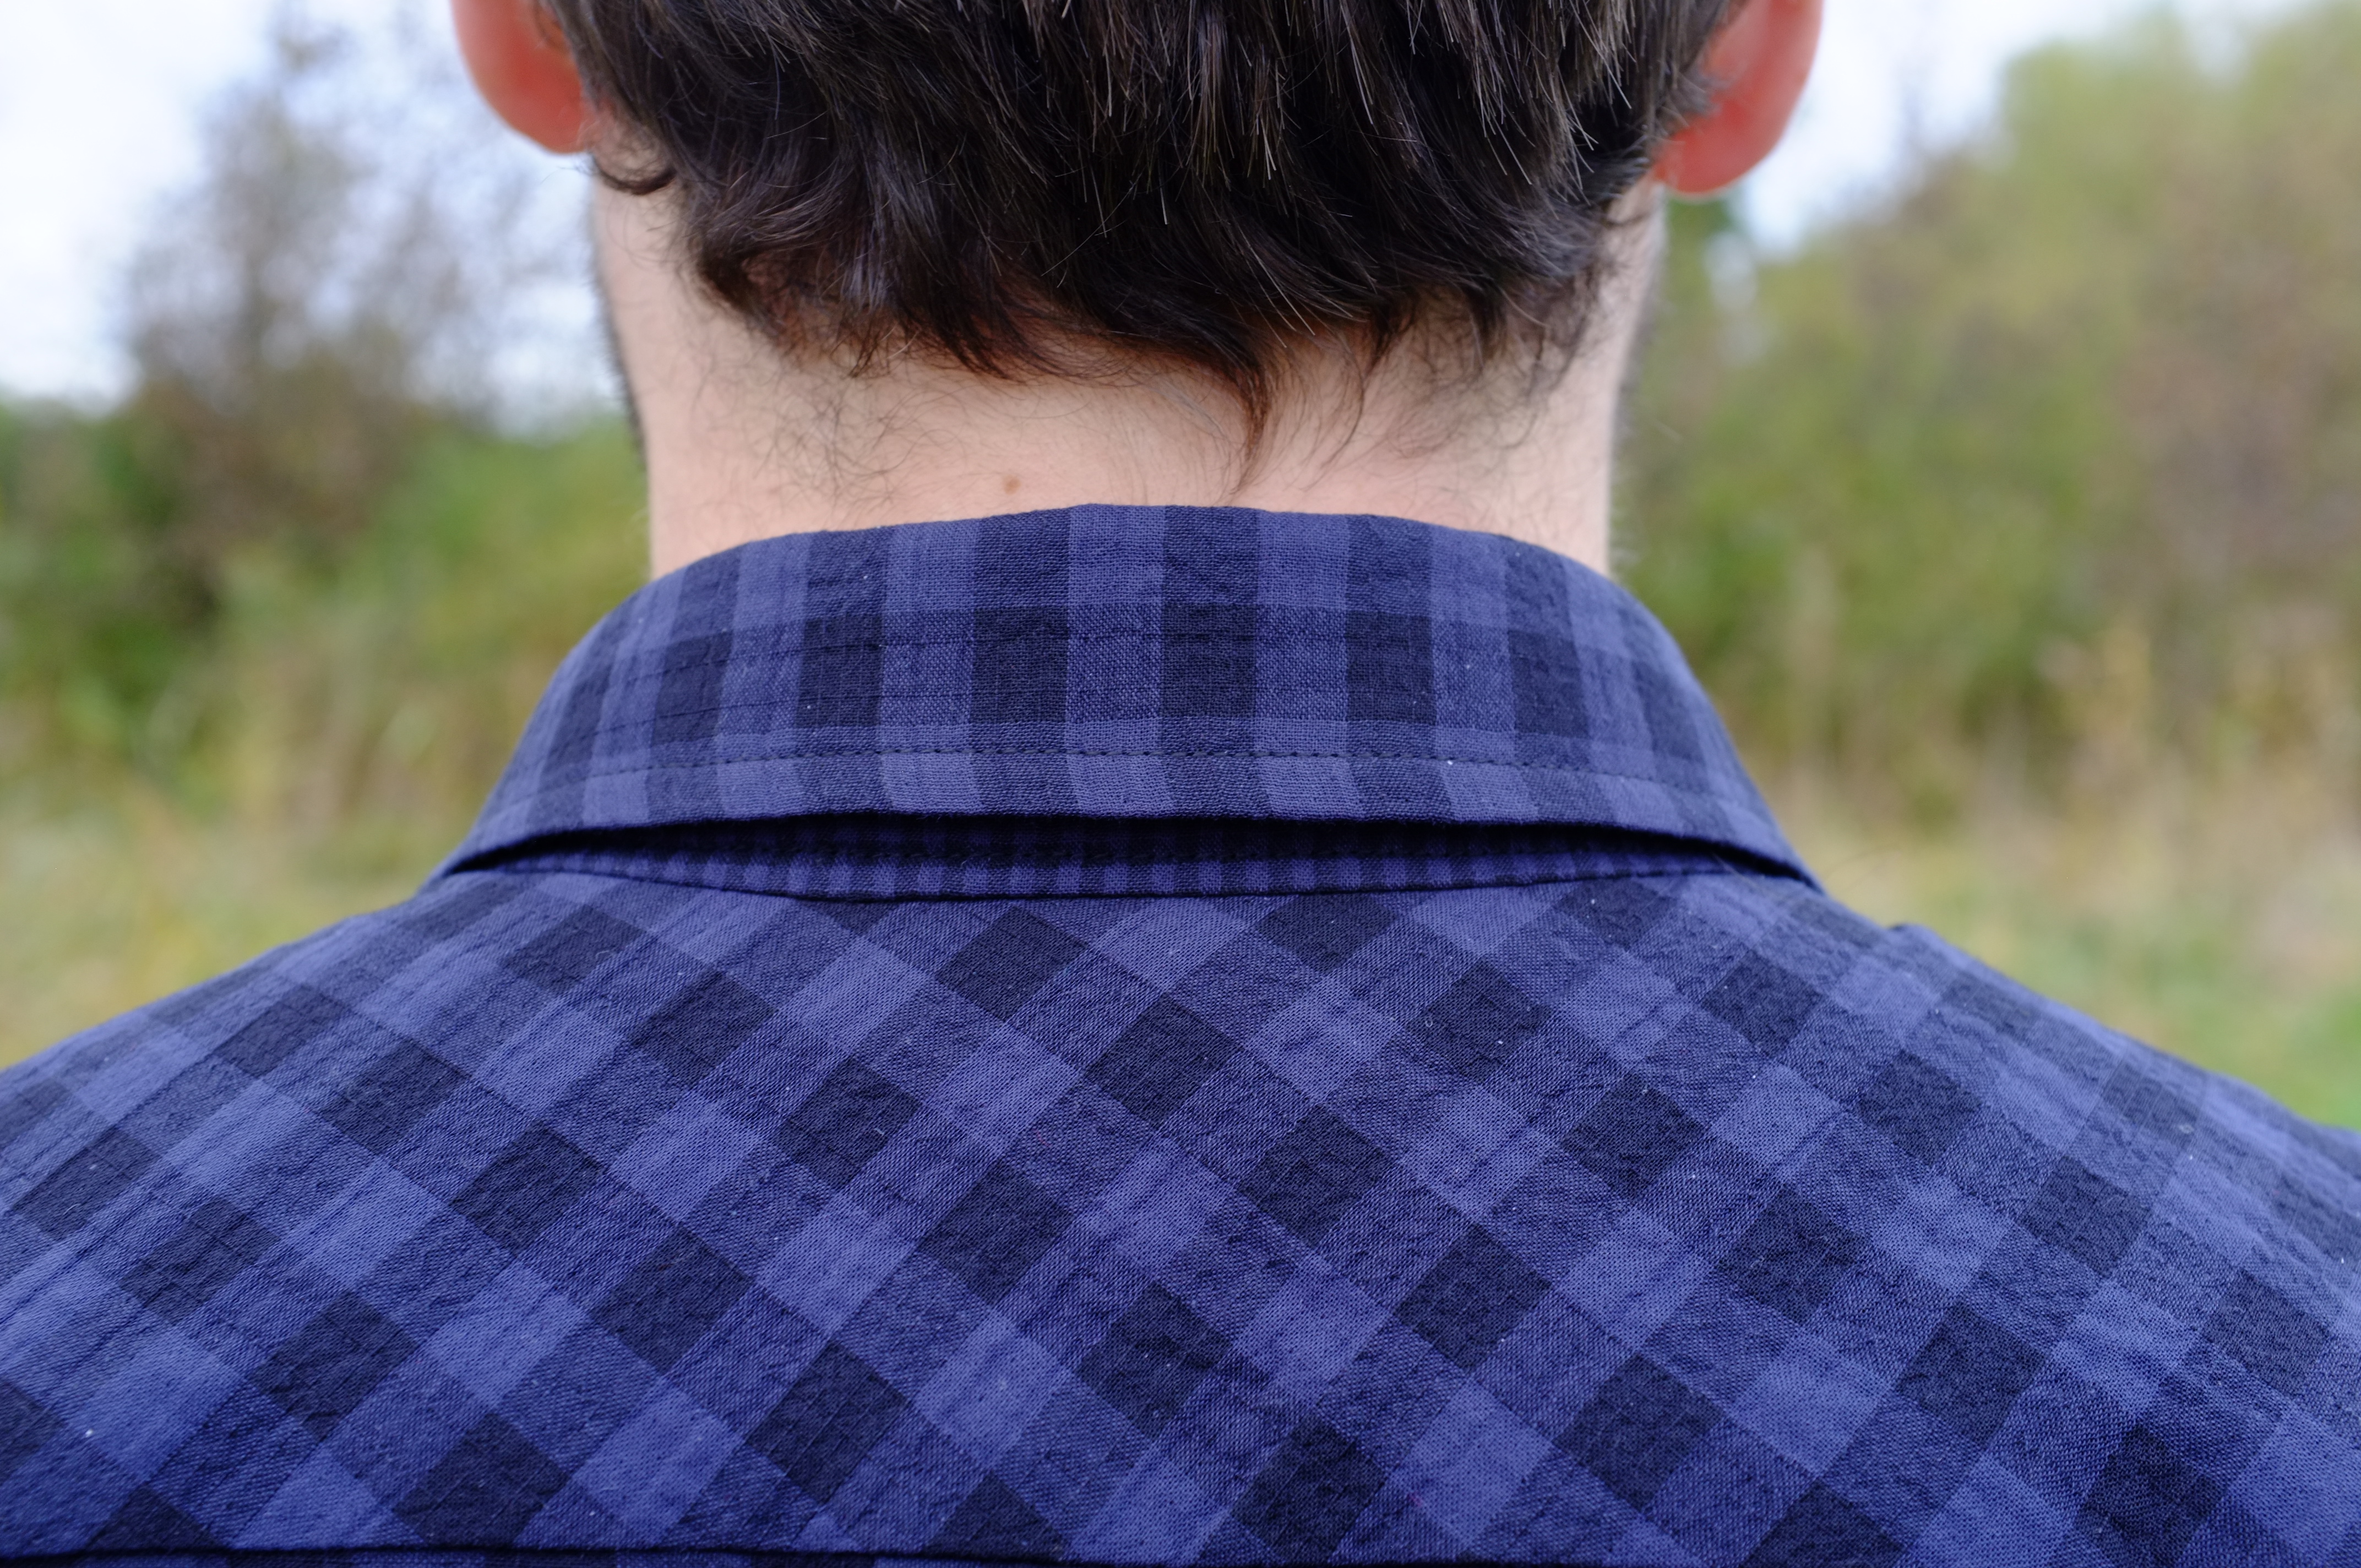
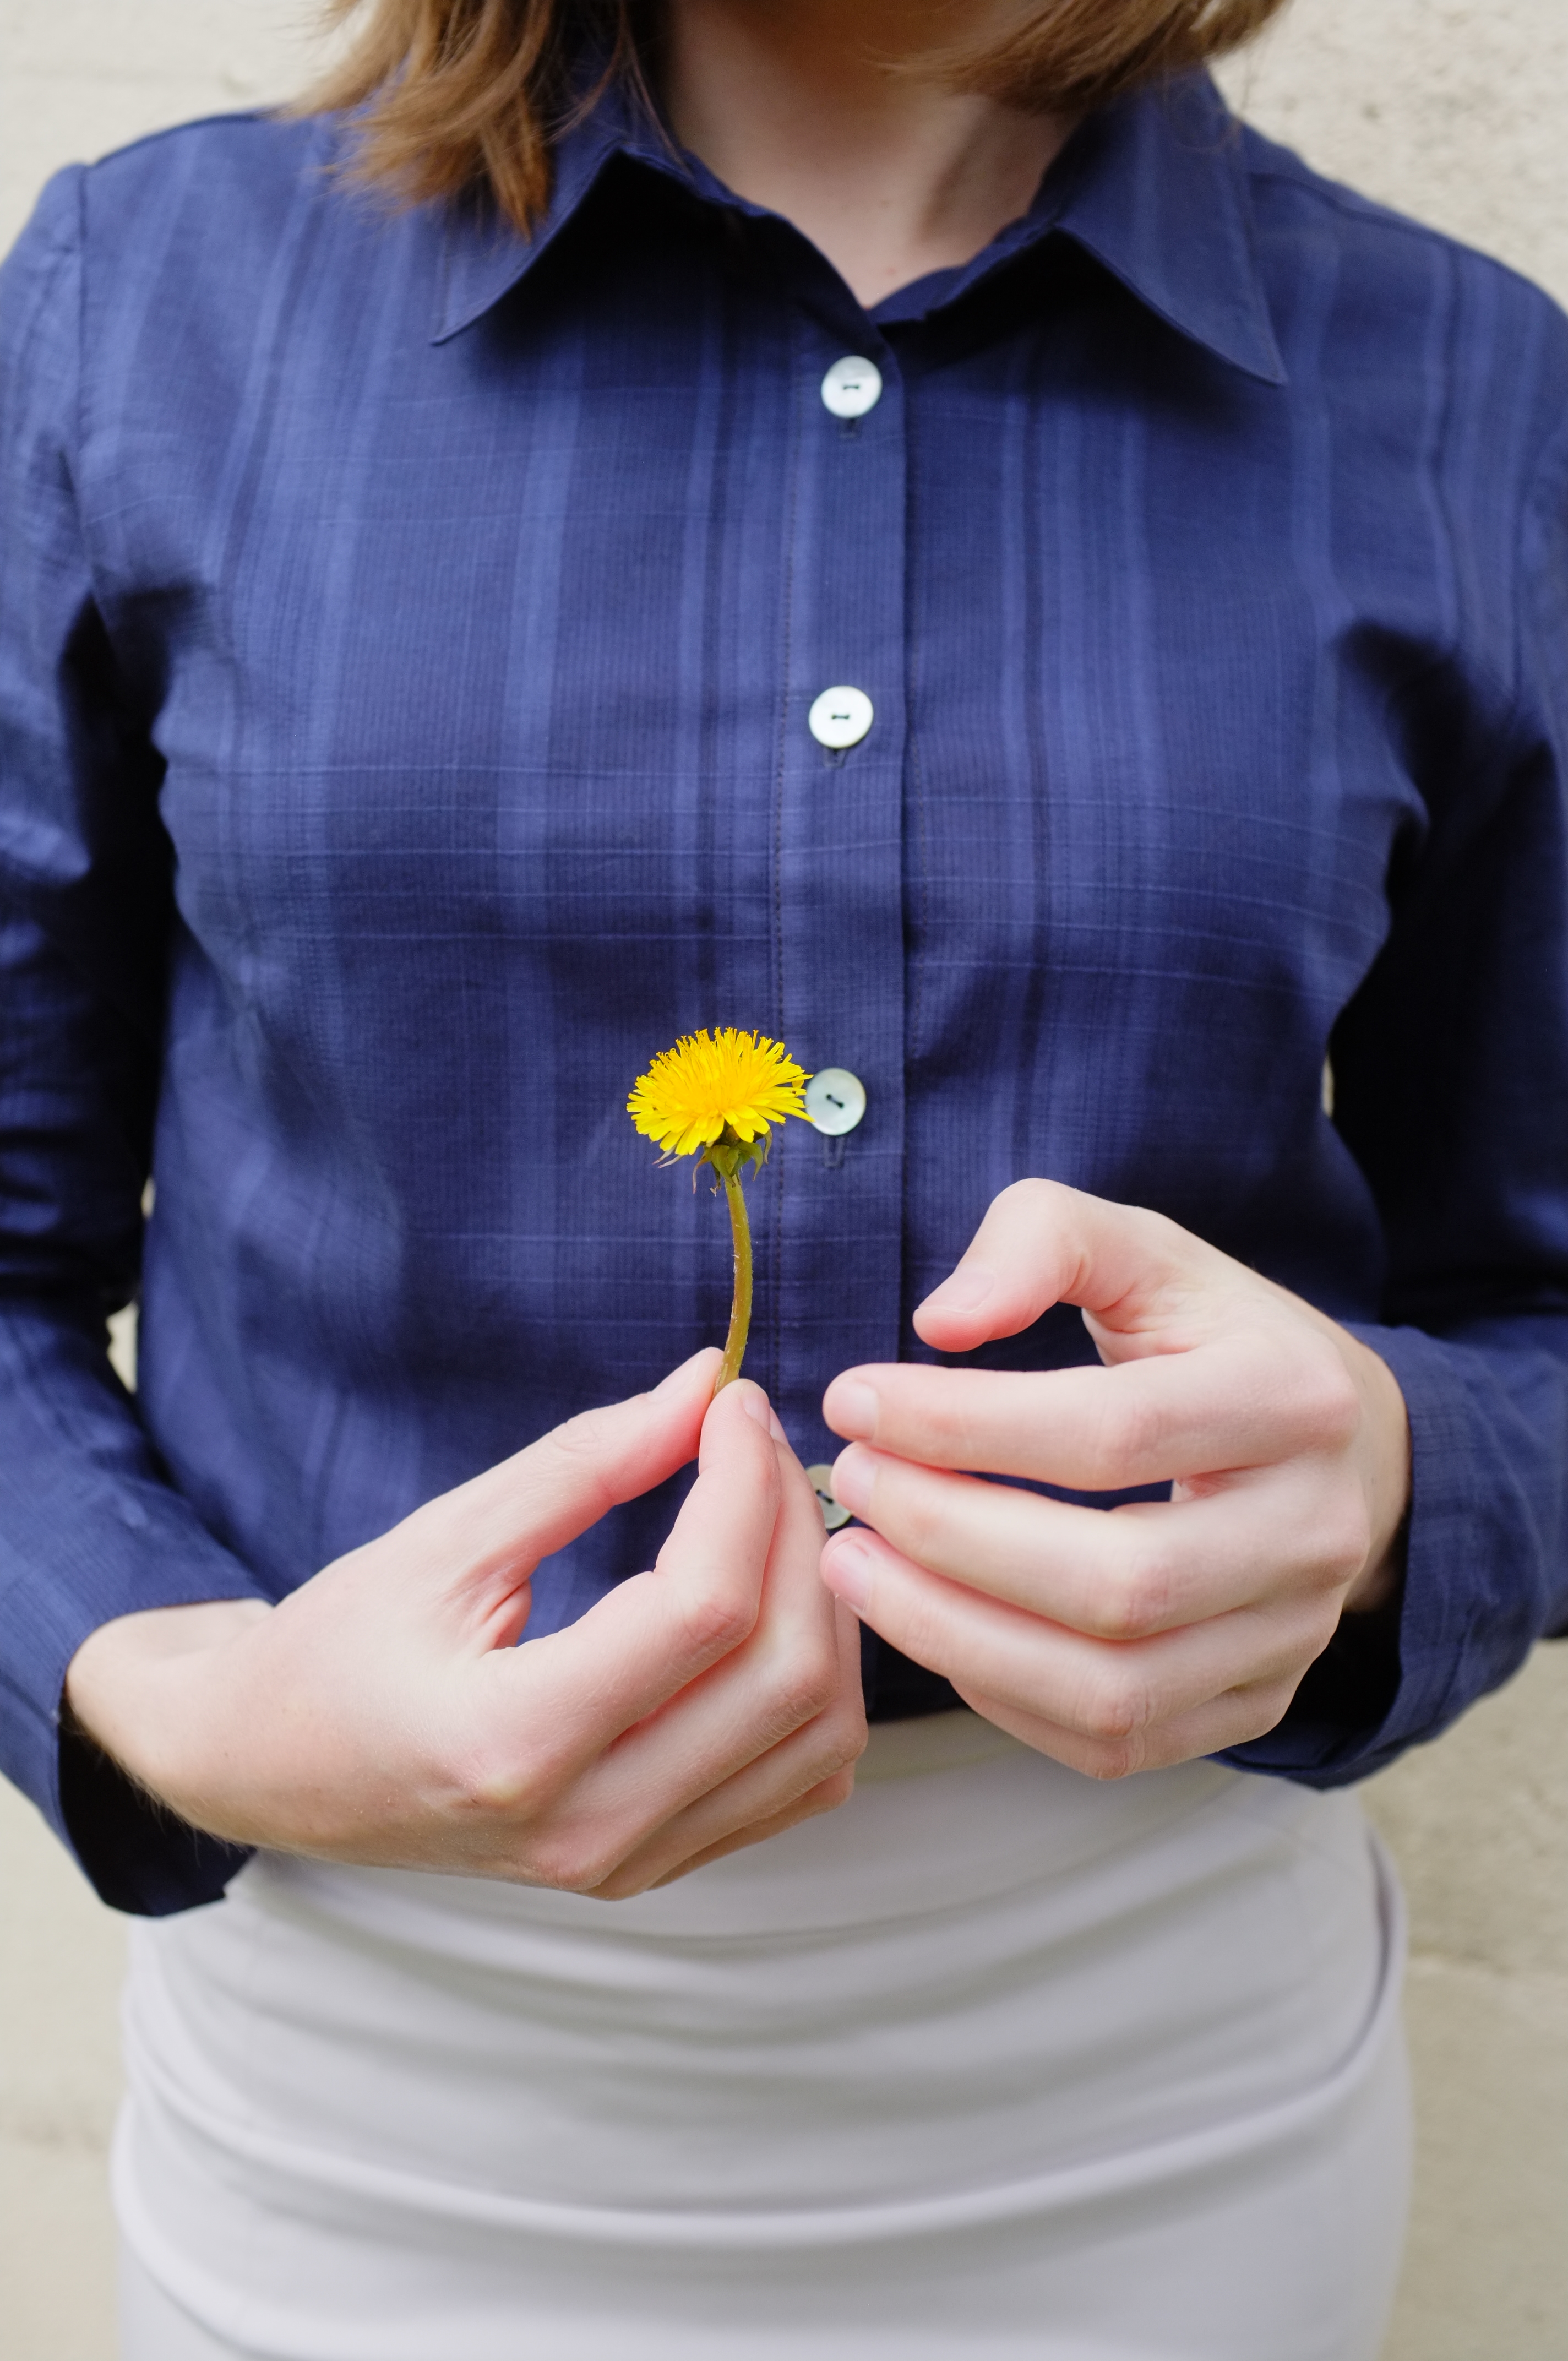
The construction was relatively easy. The only slight issue I had was that I attached the sleeve cuffs in the wrong way, which resulted in some bunching of fabric. After consulting Instagram I realised the cuffs were supposed to be folded in half, rather than at the seam, which gives a slimmer cuff and allows the the fabric to lie flat. I deviated from the instructions to finish the side and shoulder seams with flat felled seam. Due to the 1 cm seam allowance this was a little bit fiddly but thanks to the thinness of the fabric they still turned out alright. (Of course I should have thought of increasing the seam allowance before cutting.) Due to the extreme curve, I decided to finish the hem with a wide facing. I just love the neat finish and it’s a great opportunity to use some contrasting fabric.

In terms of sizing I opted for a size 10. I fell between an 8 and a 10, but really wanted a boxy look. I think the size is spot on. Tight enough but not too tight at the collar and wide enough for a loose look.

Once everything was done I realised I didn’t have any buttons in my stash that would do this fabric justice. However, I’ve been lusting after ArrowMountain buttons for ages and finally decided to splurge on a couple of sets. Since they had to be shipped from Australia, I had to wait a while for them to be delivered but they were well worth the wait, I love how the bamboo goes with the navy fabric!

So the verdict? This pattern is definitely a winner. It’s a cool silhouette and has nice design details. I actually loved it so much that I immediately made a second version with some avocado dyed linen. Stay tuned!

A shirt for the man

shirt_01This selfless sewing thing, it really not that easy when sewing time is so limited and most of the self-less sewing time is used up for baby presents. Still a shirt for my boyfriend had been on my list for ages. He’s been so supportive of my sewing adventures (he takes all the pictures for my blog) and the only thing that I ever sewed for him was a wonky, oversized T-shirt.

After having dabbled in shirt-making (the birthday shirt for my brother and blouses for myself) I knew that I wanted to make him a shirt next. At one of the Minerva Crafts Sales I got the Burda Style 6874 men’s shirt pattern, which looked like a good basic shirt that could work for proper work shirts as well as something more casual. While I really liked the Colette Negroni shirt, as an introduction to men’s shirts, I wanted something less retro and this fit the bill perfectly. When I was looking for a suitable fabric I came across this blue and black double-gauze plaid from Ditto Fabrics (unfortunately I don’t think they sell it anymore), which I first saw on Flossie Teacakes blog, made up into a beautiful shirt. It’s not the most usual fabric for a shirt, but I liked the idea of using both sides of the fabric with the larger and the smaller check.

After discussing the design options with my boyfriend, we decided to go for subtle contrasts, using the smaller check for the collar stand, the lower collar piece, the lower button band, the sleeve plackets and the gussets. We also decided on one invisible front pocket and a single box pleat in the back.

Having never sewn a shirt for him before, I checked his measurements against the chart and then the pattern pieces against one of his shirts. Amazingly I didn’t have to make any adjustments, except for shortening the hem by maybe 3 centimetres.

The construction itself was quite straightforward. The double-gauze made it a little bit difficult to sew super-accurately but with the texture of the fabric, slightly wonky seams are not noticeable anyways. The only changes I made to the construction, compared to the pattern, were to use the Negroni Shirt sleeve placket and fold the lower button band over instead of under, to show the back side of the fabric. For the collar, I used the Granville shirt instructions (though I am not convinced by the neatness of this method, I still might have to try other methods to find the ideal one). I also finished all the seams with flat-felled seams for a neat and sturdy finish. Again I realised how much I enjoy sewing technical details. Shirt-making is so much fun and sleeve plackets might actually be my favourite thing to sew.

The fit of the shirt is actually pretty good, considering that this is the first shirt I made for him. Next time I will shorten the sleeves a smidge and maybe bring the collar in slightly as the gap in the middle seems quite wide.

Overall, I absolutely love this shirt on him! It’s a lovely casual shirt which, thanks to the contrasting details, is not too boring. It was also amazing to have him in front of the camera for a change. Doesn’t he make a dapper model? In real life he also does smile a little bit more, we took these pictures just on a very cold and gloomy day. Let’s see how well this shirt will integrate in my boyfriend’s minimalist wardrobe. Maybe there will be some more of these shirts in the future.

shirt_02 shirt_03 shirt_04 shirt_05 shirt_06 shirt_07 shirt_08 shirt_09 shirt_10 shirt_11 shirt_12 shirt_13

Merken

Office wear

Silk Top_1Workwear, never the most exiting topic. I’m happy to report though that I am in love with this top. It’s made from lovely sand-washed silk that I picked up at Goldhawk Road with such a great texture (I can’t stop stroking it). I love this copper colour, particularly when paired with this cream RTW skirt. The pattern is the Sleeveless Shell Top from The Great British Sewing Bee – Fashion with Fabric book. As I wanted a loose top, I sized up to a UK 12 but removed some width at the centre front as the neckline was slightly too wide in my muslin.

I really like this pattern. The neckline and the armholes are finished with a facing, which gives it a very clean finish, ideal for a silk top like this. The seams are finished with my pinking shears. It’s probably not ideal for the longevity of this piece but since I am washing this by hand it shouldn’t be such a problem.

Design-wise, the top has a very pronounced high-low hem. I do like it in this top, but might make the hemline on the next one slightly less dramatic. The original pattern has a keyhole design at the back which I omitted.

I’ve already gotten a lot of wear out of this top. It’s light and floaty and I love how it looks tucked into a skirt.

Silk Top_4Silk Top_2Silk Top_3

The next project was the Sewaholic Granville Shirt. I’ve had this pattern sitting in my stash for quite a while now. I love a good button-down and have not yet found the perfect pattern. The Granville sounded promising as it is designed for pear shapes like me. And true, according to my measurements I only fell in one category, size 8. Happy to not have to grade I decided to sew it up as it is without any adjustments. Once sewn up, I have to say the shirt is quite on the roomy side. It’s very tapered at the waist, which becomes clear from the pattern drawing, but I didn’t expect it to flare out that much at the hip. Surprisingly also the sleeves were very long. Normally I have to add length to the sleeves (my extremities seem to be longer than average, my boyfriend lovingly calls them my orang-utan arms). In this case the sleeves, with the cuff as intended, were actually too long. As I didn’t like them as they were (too wide and with the interfacing too stiff), I decided to take them apart and half the cuff piece that wasn’t interfaced. I like them a lot better now, they look more casual and are more comfortable. The sleeve placket came together quickly. I really liked constructing them and for the tricky pointy bit I just used a glue stick to keep it in place. Worked like a charm.

One thing that I realised when I sewed on the last button was that the collar was overlapping when the top button was closed. I don’t know if that is an issue with the pattern or if I just messed up and didn’t trace the collar pieces correctly. It’s a shame as I like to wear my shirts completely buttoned up.

The fabric that I used for this shirt is some lightweight cotton from Miss Matatabi. The fabric has a very interesting texture which creates this stripey/checked pattern. I was intrigued when I saw it online and ordered it without a specific project in mind. After giving it some thought I decided it could look nice as a shirt. When it then sat on my dress form, however, it looked really drab. I don’t know what it is with navy shirts, they always look a little bit outdated. Originally I had planned to add navy buttons but to brighten the shirt up a bit I decided to go for shell buttons. I’m glad I did, it looks more fun that way.

If I was sewing this shirt again, I would slim it down a bit, including the sleeves and take in the shoulders. Oh and I would make sure to not mess up the collar, so that I can close the upper button.

I do think this is a nice basic work shirt pattern, especially for someone that likes figure-hugging shirts. The instructions were clear and thorough.

I might not be in love with this shirt due to the fitting issues and the pattern/colour combination, but it’s really comfortable to wear. And tucked into a shirt or some high waisted trousers it looks quite nice. I’m sure I’ll get some wear out of this.

Granville Shirt_1Granville Shirt_2Granville Shirt_3Granville Shirt_4Granville Shirt_5Granville Shirt_6Granville Shirt_7